DANA Widget Binding
DANA Widget Binding lets you seamlessly integrate DANA payments into your platform, allowing customers to link their DANA accounts for faster, smoother transactions across all your services. Currently there are two available binding methods:
- Normal Binding: Users enter their DANA-registered phone number manually.
- Seamless Binding: The merchant securely passes the user's phone number (already registered on their platform) to DANA, skipping manual input.
You can initiate DANA account binding between mobile apps by using a Deeplink to open the DANA App from your mobile app for a seamless in-app experience. This flexibility helps enhance user experience while ensuring secure account linking across channels.
DANA Widget is also available for payments without account binding. Check our DANA Widget Overview for more details
Before you start
You will need to register your business in our Merchant Portal to obtain your testing credentials. After you have created your test account, make sure you have done the following:
- Finish your company registration and select Integrated Payment as your payment solution.
- Setup your webhooks & redirect URLs to receive payment outcomes & redirect user after payment.
- Obtain your testing credentials from the merchant portal.
User Experience
Below is a sample of the user experience for users paying using DANA Widget Binding. The checkout page is available using web browsers on mobile devices.
- Mobile
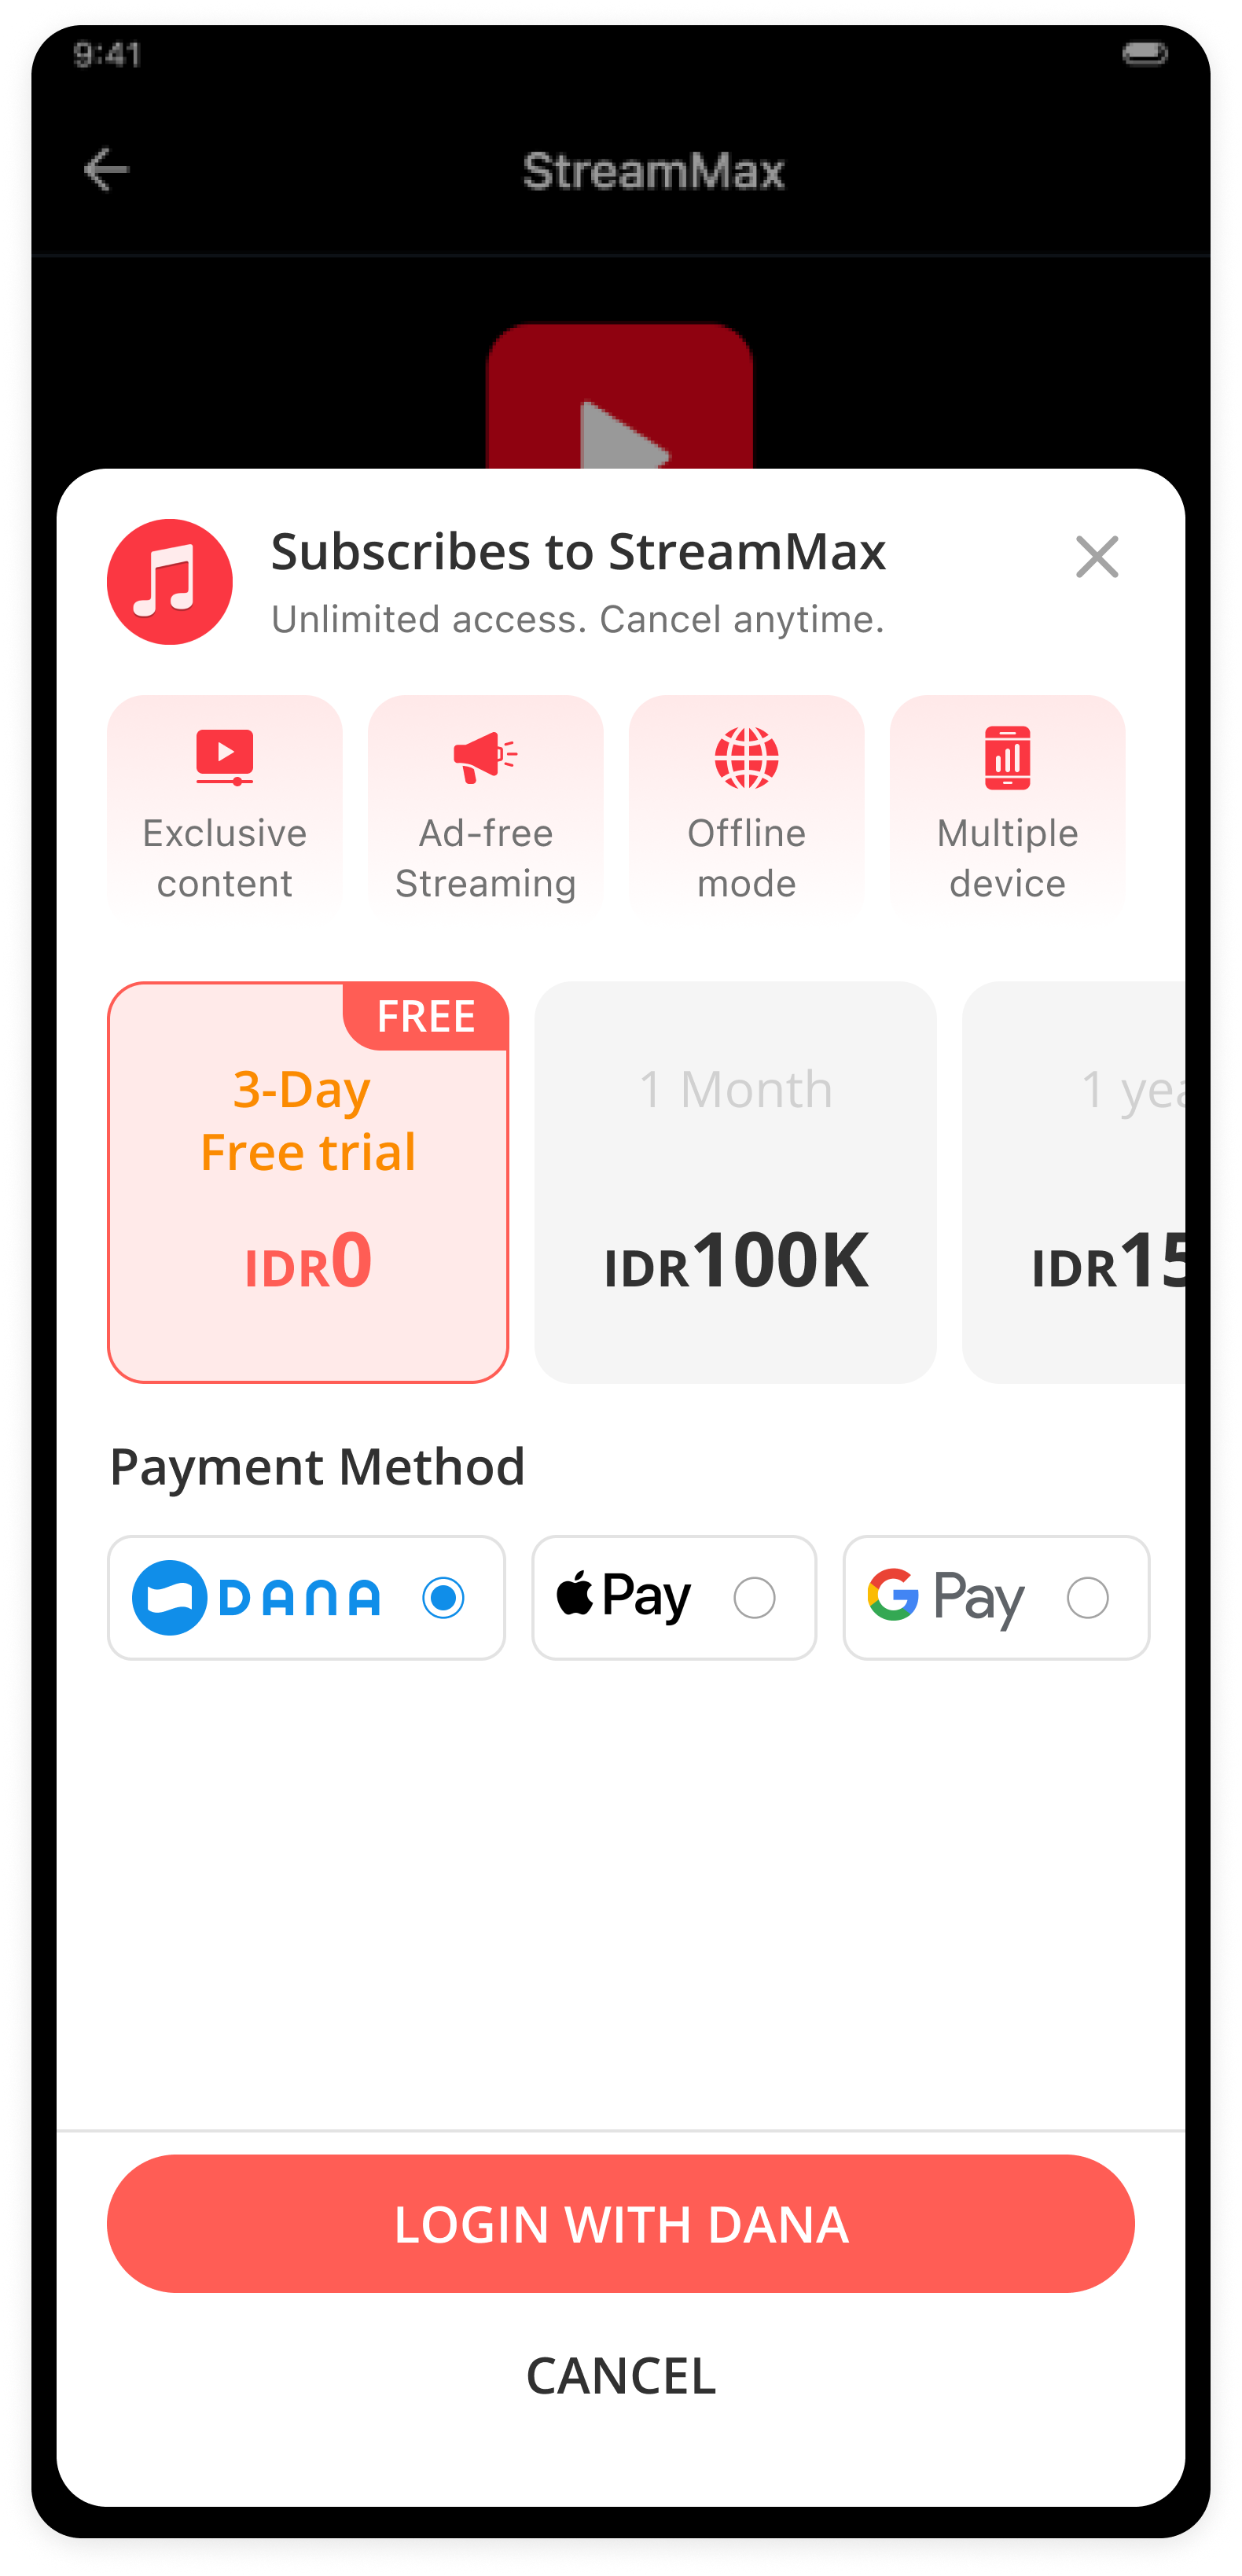
Bind with DANA Account
Connect customer’s DANA accounts with your own!
Simple binding process
Just provide the customer phone number and we’ll do the rest!
Provide seamless payment
Linked accounts can enjoy a more seamless payment experience.
Pay with DANA
Customers can pay using payment methods available in their DANA Account.
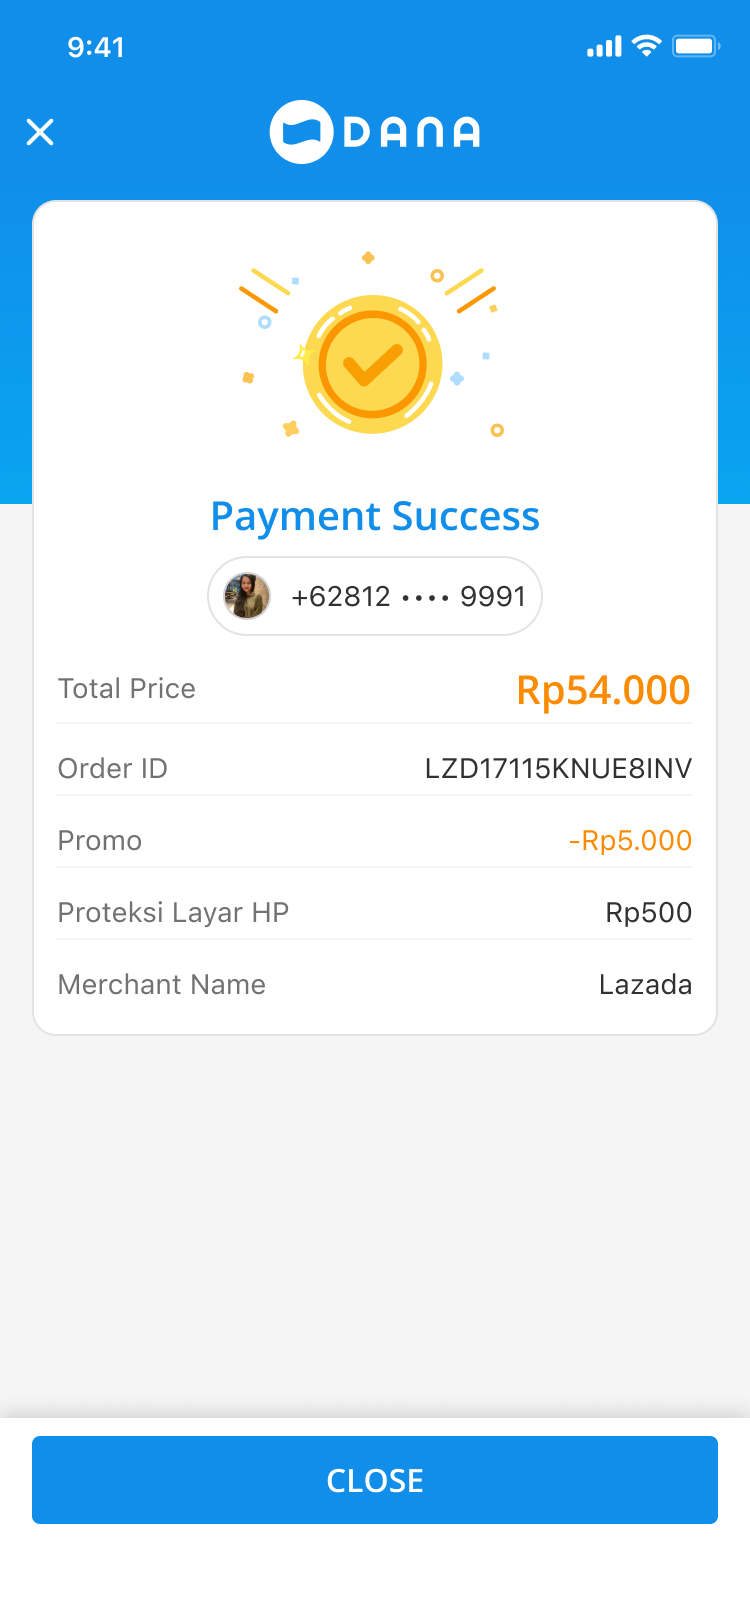
Instant Payment Result
You & your customers instantly receive payment result.
Process Flow
The general flow of payment using the DANA Widget Binding is as follows:
Visit the DANA Widget API Overview for edge cases and other scenarios.
- Binding
- Payment
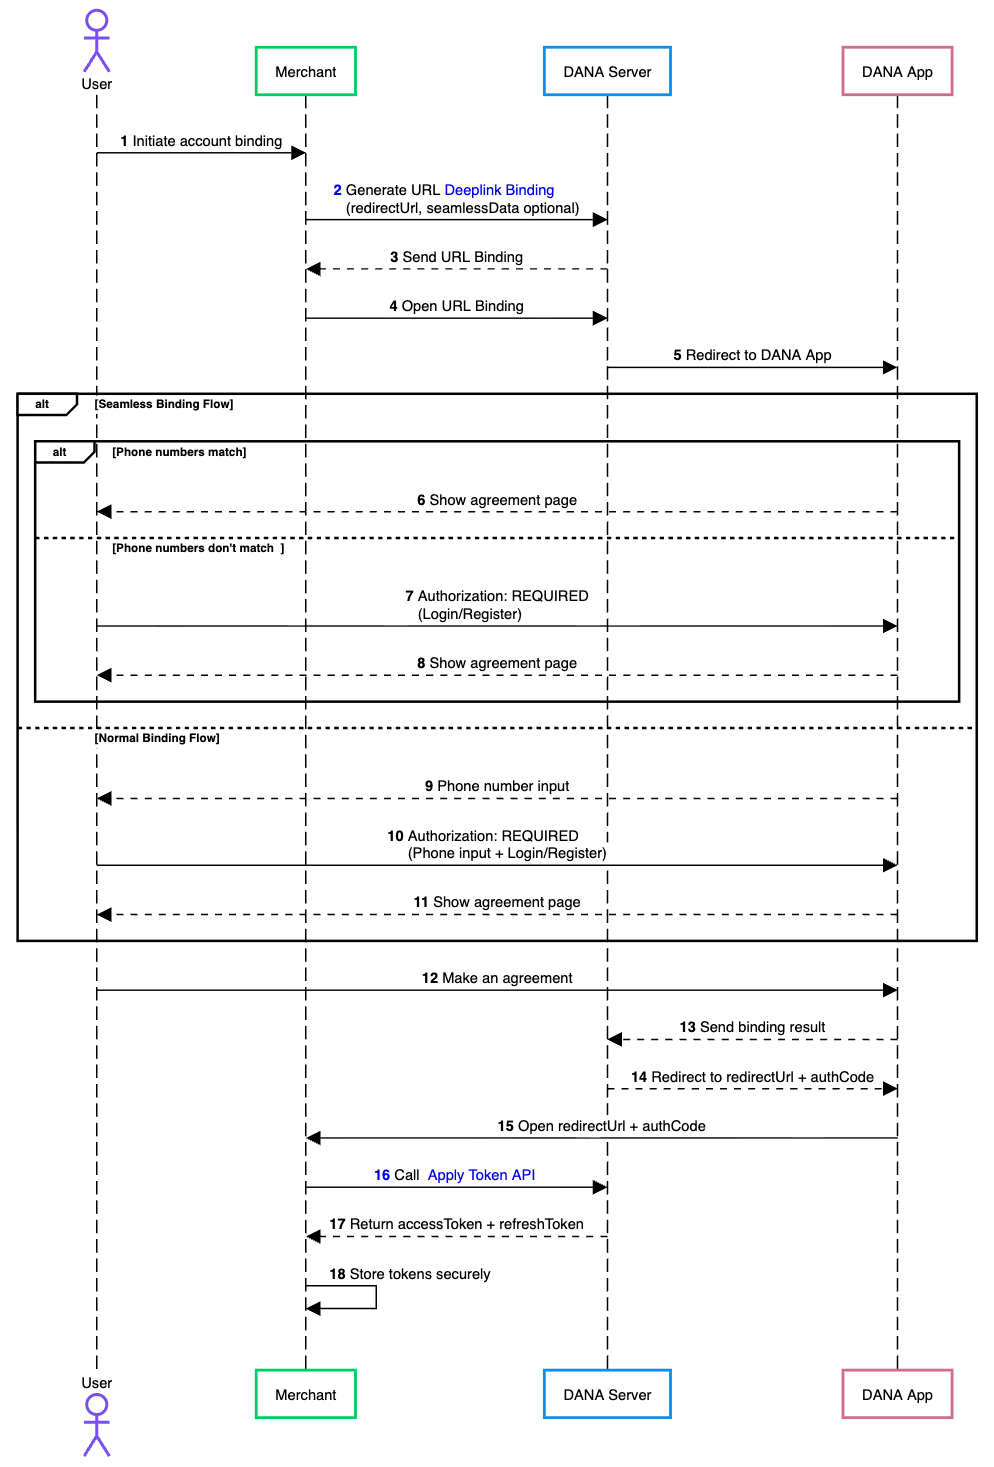
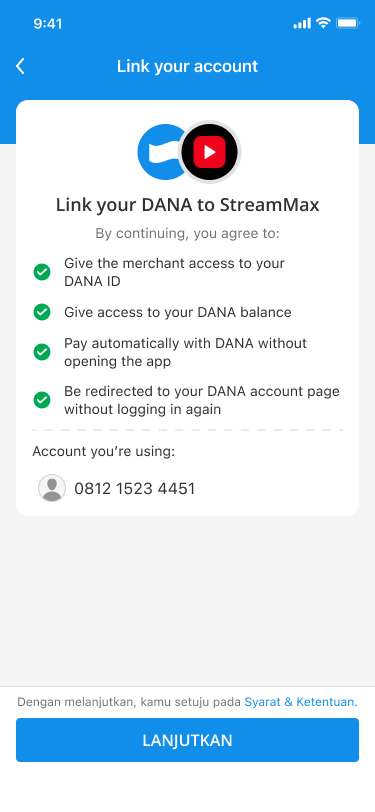
- User begins DANA account binding with the merchant platform.
- Merchant calls Deeplink Binding to generate the binding URL by providing redirectUrl, with seamlessData as an optional parameter.
- DANA returns the generated binding URL to the merchant.
- Merchant opens the binding URL returned by DANA.
- DANA redirects the user to the DANA App to continue the binding process.
- If merchant provides
seamlessDataparameter, the Seamless Binding process will be used and DANA will check if the user's phone number inside theseamlessDatamatches with then account that is logged into their DANA app. If they match, DANA will direct to agreement page. - If the
seamlessDatauser's phone number is different from the logged in account, DANA will require the user to log out of their current phone number and login or register using theseamlessDataphone number. - After successful authorization, DANA redirects the user to the agreement page.
- When merchant does not provide
seamlessData, the Normal Binding process will be used and DANA will show the phone number input screen. - User enters phone number and do login or register.
- After successful authorization, DANA redirects the user to the agreement page.
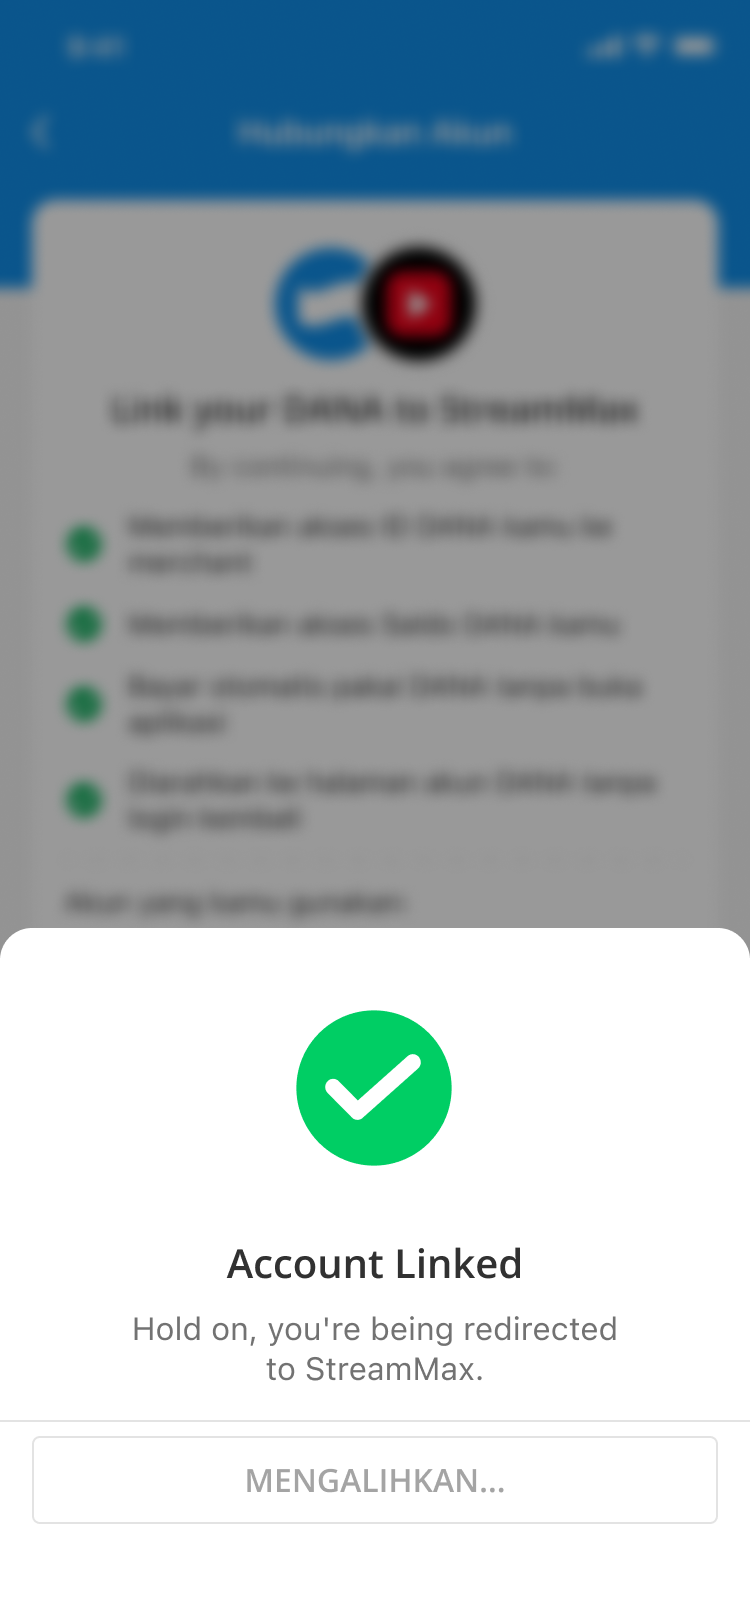
- User makes an agreement to continue the process.
- DANA returns the result of binding process to DANA Server.
- DANA Server redirects the user to the merchant’s redirectUrl along with authCode.
- The redirect URL with authCode is opened on the merchant side.
- Merchant exchanges the
authCodefor an accessToken by calling Apply Token API. - DANA returns the
accessTokenandrefreshTokenthat are valid for each user. - The merchant stores
accessTokenandrefreshToken.
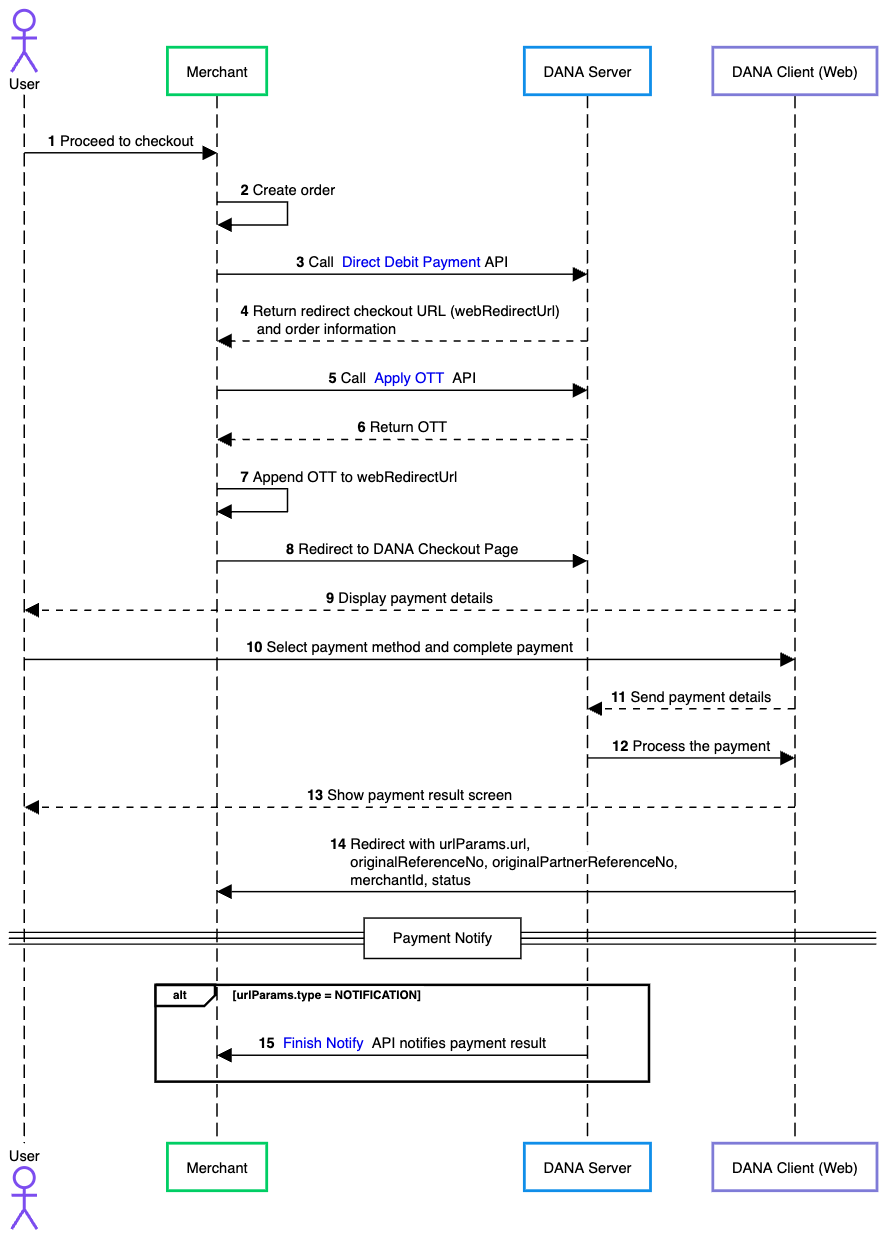
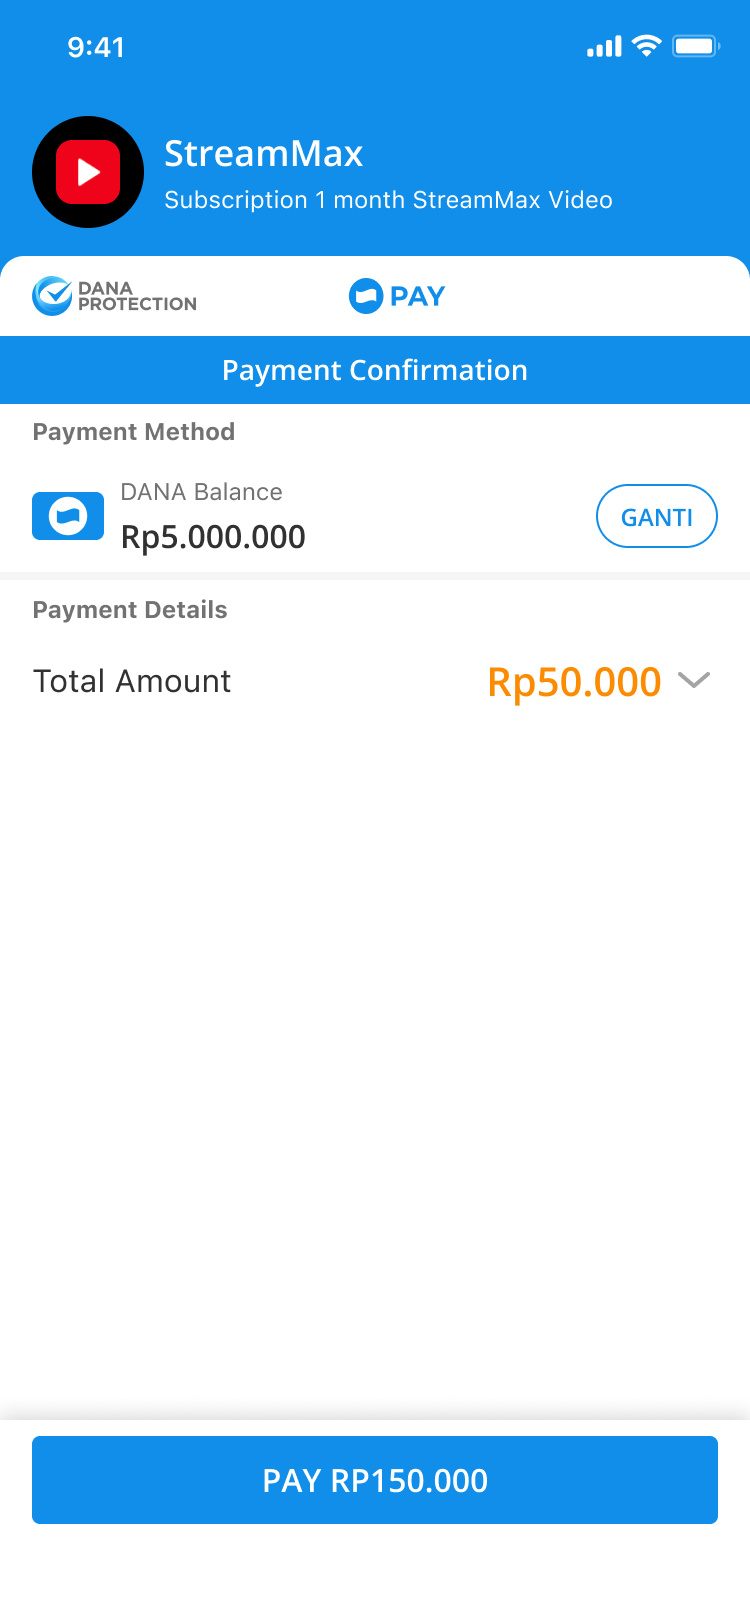
- The user browses the merchant's website or app and proceeds to checkout after selecting a product.
- The merchant system generates an order internally, preparing it for payment processing.
- The merchant's backend sends a request to DANA's Direct Debit Payment API, passing the necessary order details.
- After successfully creating the order, DANA responds with a
webRedirectUrlfor the checkout page and order information. - In order to access the DANA Web page, merchant needs the OTT. To obtain the OTT, merchant needs to apply for it by calling DANA's Apply OTT API using the accessToken.
- DANA returns the OTT.
- Merchant appends the OTT from DANA into the
webRedirectUrlthat was obtained from Direct Debit Payment's response. - Merchant redirects the user to DANA Checkout page.
- DANA displays payment details to user and available payment methods.
- The user chooses one of the supported payment methods provided by DANA and follows the instructions on the DANA checkout page to complete the payment.
- DANA Web page receives the payment details and sends them to DANA API.
- DANA processes the payment.
- DANA shows payment result screen to user.
- DANA redirects the user back to the URL that the merchant specified when calling the Direct Debit Payment API. The redirect URL follows this format:
https:xxx?originalReferenceNo=xxx&originalPartnerReferenceNo=xxx&merchantId=xxxx&status=xxx.- merchant redirect URL: set on
urlParams.url - originalReferenceNo: Original transaction identifier on DANA system
- originalPartnerReferenceNo: Original transaction identifier on partner system
- merchantId: Merchant identifier that is unique per each merchant
- status: Payment transaction in DANA side
- Example:
https://www.merchantUrl.com/result/?originalReferenceNo=20250613111212800100166070954004283&originalPartnerReferenceNo=8562466e47144b5f82c003b47ae3c474&merchantId=216620000020928274717&status=SUCCESS
- merchant redirect URL: set on
- If merchant adds urlParams.type =
NOTIFICATION, DANA will send a payment notification to the merchant's system via the Finish Notify API, updating the payment status of the order.
- NodeJS
- Python
- Go
- PHP
- Java
Step 1 : Library Installation
Visit our Libraries & Plugins guide for detailed information on our SDK.
DANA provides server-side API libraries for several programming languages, available through common package managers, for easier installation and version management. Follow the guide below to install our library:
Requirements
- Node.js version 18 or later
- Your testing credentials from the merchant portal.
Installation
Install using npm or visit our Githubnpm install dana-node@latest --save
Set up the env
PRIVATE_KEY or PRIVATE_KEY_PATH        # Your private key
ORIGIN                                 # Your application's origin URL
X_PARTNER_ID                           # clientId provided during onboarding
ENV                                    # DANA's environment either 'sandbox' or 'production'
Obtaining merchant credentials: Authentication
Step 2 : Initialize the library
Visit our Authentication guide to learn about the authentication process when not using our Library.
Follow the guide below to initialize the library
import { Dana, WidgetApi as WidgetApiClient } from 'dana-node';

const danaClient = new Dana({
    partnerId: "YOUR_PARTNER_ID", // process.env.X_PARTNER_ID
    privateKey: "YOUR_PRIVATE_KEY", // process.env.X_PRIVATE_KEY
    origin: "YOUR_ORIGIN", // process.env.ORIGIN
    env: "sandbox", // process.env.DANA_ENV or process.env.ENV or "sandbox" or "production"
});
const { WidgetApi } = danaClient;
Step 3 : Bind to DANA Account
To bind a DANA Account, you first generate the binding deeplink/redirect URL, open it to hand off the user to the DANA App to complete authorization, then return the user to your App via your redirectUrl. The flow is as follows:
Call the Deeplink Binding to generate the redirect URL for DANA account binding. If you already have the user’s phone number and want to use Seamless Binding, include seamlessData in the request so the user can skip manual input. If you don’t provide seamlessData, DANA will use Normal Binding and ask the user to enter their phone number.
import { WidgetUtils } from 'dana-node/widget/v1';

// Generate OAuth URL
const oauth2UrlData = {
    redirectUrl: 'https://your-redirect-url.com',
    externalId: 'your-external-id', // or use uuidv4()
    merchantId: process.env.MERCHANT_ID,
    seamlessData: {
        mobileNumber: '08xxxxxxxxx' // Optional
    }
};

const oauthUrl = WidgetUtils.generateOauthUrl(oauth2UrlData);
console.log(oauthUrl);
Open the Deeplink/redirect URL using the OS/native browser so universal links and deeplinks can correctly hand off to the DANA App.
If you must use an in-app WebView, intercept DANA deeplinks/universal links and open them externally (don’t let the WebView load them as normal pages). Allowlist:
danaid://https://link.dana.idhttps://m.dana.idhttps://danaid.link
Implementation tips:
- Android WebView: implement both
shouldOverrideUrlLoadingvariants, open withIntent(Intent.ACTION_VIEW, uri), then returntrue. - React Native WebView: use
onShouldStartLoadWithRequest, callLinking.openURL(req.url)for allowlisted URLs /intent://, then returnfalse. - Flutter WebView: listen to URL changes, stop navigation for allowlisted URLs, then launch via OS.
- Web redirects: prefer a user click on an
<a href="...">link; if issues occur withwindow.open/window.location.href, switch to a click based redirect.
If you still encounter WebView or web redirect issues, refer to: Deeplink Binding and Payment
After authorization, DANA redirects the user to the merchant’s redirectUrl with an authCode. This authCode is valid for 10 minutes, exchange it immediately for an access token via the Apply Token API.
https://www.merchant.com/oauth/callback?responseCode=2001000&responseMessage=Successful&authCode=xxx&state=2345555
Step 4 : Exchange the authCode into accessToken
After obtaining the authCode, exchange it for an accessToken using the Apply Token API. The returned accessToken and refreshToken both have a 3-year validity period. Once expired, users must rebind their DANA account.
import { Dana } from 'dana-node';

const danaClient = new Dana({
    // .. initialize client with authentication
});
const { WidgetApi } = danaClient;

const request: ApplyTokenRequest = {
    // Fill in required fields here, refer to Apply Token API Detail
};

const response: ApplyTokenResponse = await WidgetApi.applyToken(request);
Step 5 : Use the Direct Debit Payment API to get a hosted checkout URL
Use the Direct Debit Payment API to create new payment requests which will then return the Checkout URL of the hosted payment page.
To create a new order, make a POST request to the Direct Debit Payment API:
import { Dana } from 'dana-node';

// .. initialize client with authentication

const request: WidgetPaymentRequest = {
    // Fill in required fields here, refer to Direct Debit Payment API Detail
};

const response: WidgetPaymentResponse = await WidgetApi.widgetPayment(request);
If successful, the response will include the URL for the DANA's payment page. For example:
Content-Type: application/json
X-TIMESTAMP: 2020-12-23T08:31:11+07:00
{
  "responseCode": "2005400", // Refer to response code list
  "responseMessage": "Successful", // Refer to response code list
  "referenceNo": "2020102977770000000009", // Transaction identifier on DANA system
  "partnerReferenceNo": "2020102900000000000001", // Transaction identifier on partner system
  "webRedirectUrl": "https://pjsp.com/universal?bizNo=REF993883&...",
  "additionalInfo":{}
}
Step 6 : Access DANA's page by hitting Apply OTT API
To access DANA's payment page, convert the user's access token to a one-time token (OTT) via the Apply OTT API. This token has a 10-minute expiration period and can be used only once.
import { Dana } from 'dana-node';

const danaClient = new Dana({
    // .. initialize client with authentication
});
const { WidgetApi } = danaClient;

const request: ApplyOTTRequest = {
    // Fill in required fields here, refer to Apply OTT API Detail
};

const response: ApplyOTTResponse = await WidgetApi.applyOTT(request);
Step 7 : Redirect to DANA's checkout page
Generate a payment URL by combining the webRedirectUrl from the Direct Debit Payment API with an OTT token from the Apply OTT API.
import { Util } from 'dana-node/widget/v1';
import { WidgetPaymentResponse, ApplyOTTResponse } from 'dana-node/widget/v1/models';

// Example response from createWidgetPayment
const widgetPaymentResponse = new WidgetPaymentResponse({
  webRedirectUrl: 'https://example.com/payment?token=abc123'
}); // this should be from createPayment Widget API

// Example response from applyOTT
const applyOTTResponse = new ApplyOTTResponse({
  userResources: [
    {
      value: 'ott_token_value'
    }
  ]
}); // this should be from applyOTT Widget API

// Generate the payment URL
const paymentUrl = Util.generateCompletePaymentUrl(widgetPaymentResponse, applyOTTResponse);
Optional Query Order Status, Cancel Order, Refund Order, Balance Inquiry, and Query User Profile
There are additional APIs available to enhance your integration process:
- Query Payment API - Use this API to inquire the latest status of a payment request.
- Cancel Order API - For unpaid orders or those paid within 24 hours, a full refund returns to the customer's original payment source.
- Refund Order API - Process refunds for completed orders. You can trigger a refund request on behalf of the customer using this API, who will then process the refund through DANA.
- Balance Inquiry API - Implement this API to verify the customer's balance before order creation. Disabling payment methods with insufficient funds will increase your order success rate.
- Query User Profile API - In order to obtain the user's profile information including DANA balance (unit in IDR), masked DANA phone number, KYC status or One Time Token (OTT).
import { Dana } from 'dana-node';
const danaClient = new Dana({
    // .. initialize client with authentication
});
const { WidgetApi } = danaClient;

const request: QueryPaymentRequest = {
    // Fill in required fields here, refer to Query Payment API Detail
};

const response: QueryPaymentResponse = await WidgetApi.queryPayment(request);
import { Dana } from 'dana-node';

const danaClient = new Dana({
  // .. initialize client with authentication
});
const { WidgetApi } = danaClient;

const request: CancelOrderRequest = {
    // Fill in required fields here, refer to Cancel Order API Detail
};

const response: CancelOrderResponse = await WidgetApi.cancelOrder(request);
import { Dana } from 'dana-node';

const danaClient = new Dana({
  // .. initialize client with authentication
});
const { WidgetApi } = danaClient;

const request: RefundOrderRequest = {
    // Fill in required fields here, refer to Refund Order API Detail
};

const response: RefundOrderResponse = await WidgetApi.refundOrder(request);
import { Dana } from 'dana-node';

const danaClient = new Dana({
    // .. initialize client with authentication
});
const { WidgetApi } = danaClient;

const request: BalanceInquiryRequest = {
    // Fill in required fields here, refer to Balance Inquiry API Detail
};

const response: BalanceInquiryResponse = await WidgetApi.balanceInquiry(request);
import { Dana } from 'dana-node';
import { QueryUserProfileRequest, QueryUserProfileResponse } from 'dana-node/widget/v1';

const danaClient = new Dana({
    // .. initialize client with authentication
});
const { WidgetApi } = danaClient;

const request: QueryUserProfileRequest = {
    // Fill in required fields here, refer to Query User Profile API Detail
};

const response: QueryUserProfileResponse = await widgetApi.queryUserProfile(request);
Step 8 : Receive Payment Outcome
After a successful payment:
-
Notification: The user will be redirected to your specified Redirect URL, which you can configure using the
urlParamsparameter in the Direct Debit Payment API request, the redirection URL has a format like:https:xxx?originalReferenceNo=xxx&originalPartnerReferenceNo=xxx&merchantId=xxxx&status=xxx- merchant redirect URL: set on
urlParams.url - originalReferenceNo: Original transaction identifier on DANA system
- originalPartnerReferenceNo: Original transaction identifier on partner system
- merchantId: Merchant identifier that is unique per each merchant
- status: Payment transaction in DANA side
- Example:
https://www.merchantUrl.com/result/?originalReferenceNo=20250613111212800100166070954004283&originalPartnerReferenceNo=8562466e47144b5f82c003b47ae3c474&merchantId=216620000020928274717&status=SUCCESS
- merchant redirect URL: set on
-
[Optional] Finish Notify: In case you add
urlParams.type = NOTIFICATION, DANA will send payment notifications to your Notification URL via the Finish Notify API. Configure your notification endpoint with the ASPI-mandated path format:/v1.0/debit/notify.
Construction
new WebhookParser(publicKey?: string, publicKeyPath?: string)
Request
| Parameter | Type | Remarks |
|---|---|---|
| publicKey | string | The DANA gateway's public key as a PEM formatted string. This is used if publicKeyPath is not provided or is empty |
| publicKeyPath | string | The file path to the DANA gateway's public key PEM file. If provided, this will be prioritized over the publicKey string |
Notes: One of publicKey or publicKeyPath must be provided.
Method
parseWebhook(httpMethod: string, relativePathUrl: string, headers: { [key: string]: string }, body: string): FinishNotifyRequest
Request
| Parameter | Type | Remarks |
|---|---|---|
| httpMethod | string | The HTTP method of the incoming webhook request e.g., POST |
| relative_path_url | string | The relative URL path of the webhook endpoint that received the notification e.g /v1.0/debit/notify |
| headers | map[string]string | A map containing the HTTP request headers. This map must include X-SIGNATURE and X-TIMESTAMP headers provided by DANA for signature verification |
| body | string | The raw JSON string payload from the webhook request body |
- Returns: A pointer to a
FinishNotifyRequeststruct containing the parsed and verified webhook data, or an error if parsing or signature verification fails. - Raises:
ValueErrorif signature verification fails or the payload is invalid.
Security Notes
- Always use the official public key provided by DANA for webhook verification.
- Reject any webhook requests that fail signature verification or have malformed payloads.
- Never trust webhook data unless it passes verification.
import { WebhookParser } from 'dana-node/dist/webhook'; // Adjust import path as needed

async function handleDanaWebhook(req: AnyRequestType, res: AnyResponseType) {
    // Retrieve the DANA public key from environment variables or a secure configuration.
    // Option 1: Public key as a string
    const danaPublicKeyString: string | undefined = process.env.DANA_WEBHOOK_PUBLIC_KEY_STRING;
    // Option 2: Path to the public key file (recommended for production)
    const danaPublicKeyPath: string | undefined = process.env.DANA_WEBHOOK_PUBLIC_KEY_PATH;

    if (!danaPublicKeyString && !danaPublicKeyPath) {
        console.error('DANA webhook public key not configured.');
        res.status(500).send('Webhook processor configuration error.'); // Or appropriate error handling
        return;
    }

    const httpMethod: string = req.method!; // e.g., "POST"
    const relativePathUrl: string = req.path!; // e.g., "/v1.0/debit/notify". Ensure this is the path DANA signs.

    const headers: Record<string, string> = req.headers as Record<string, string>;

    let requestBodyString: string;
    if (typeof req.body === 'string') {
        requestBodyString = req.body;
    } else if (req.body && typeof req.body === 'object') {
        requestBodyString = JSON.stringify(req.body);
    } else {
        console.error('Request body is not a string or a parseable object.');
        res.status(400).send('Invalid request body format.');
        return;
    }

    // Initialize WebhookParser.
    const parser = new WebhookParser(danaPublicKeyString, danaPublicKeyPath);

    try {
        // Verify the signature and parse the webhook payload
        const finishNotify = parser.parseWebhook(
            httpMethod,
            relativePathUrl,
            headers,
            requestBodyString
        );

        console.log('Webhook verified successfully:');
        console.log('Original Partner Reference No:', finishNotify.originalPartnerReferenceNo);
        // TODO: Process the finishNotify object (e.g., update order status in your database)

        res.status(200).send('Webhook received and verified.');
    } catch (error: any) { // Catching as 'any' to access error.message
        console.error('Webhook verification failed:', error.message);
        // Respond with an error status. DANA might retry if it receives an error.
        res.status(400).send(`Webhook verification failed: ${error.message}`);
    }
}
For detailed example, please refer to the following resource: Example Webhook.
Example of a successful payment webhook payload:
Content-type: application/json
X-TIMESTAMP: 2020-12-23T07:44:16+07:00
{
  "responseCode": "2005600",
  "responseMessage": "Successful"
}
Additional Enum Configuration
The library provides several enums (enumerations) to represent a fixed set of constant values, ensuring consistency and reducing errors during integration.
import { EnvInfoSourcePlatformEnum } from 'dana-node/dist/widget/v1';

const ipg = EnvInfoSourcePlatformEnum.Ipg;
The following enums are available in the Library DANA Widget:
- AcquirementStatusEnum
- ActorTypeEnum
- GrantTypeEnum
- OrderTerminalTypeEnum
- PayMethodEnum
- PayOptionEnum
- PromoTypeEnum
- ResourceTypeEnum
- ResultStatusEnum
- ServiceScenarioEnum
- ServiceTypeEnum
- SourcePlatformEnum
- TerminalTypeEnum
- TypeEnum
Optional Revoke DANA's user account
Use the Account Unbinding API to remove the connection between your platform and a user's DANA account. For specific users, contact DANA directly.
import { Dana } from 'dana-node';

const danaClient = new Dana({
    // .. initialize client with authentication
});
const { WidgetApi } = danaClient;

const request: AccountUnbindingRequest = {
    // Fill in required fields here, refer to Account Unbinding API Detail
};

const response: AccountUnbindingResponse = await WidgetApi.accountUnbinding(request);
Step 9 : Test using our automated test suite
Visit our Scenario Testing guide for detailed information on testing requirements.
We are required by local regulators to ensure your integration works correctly across all critical use cases. Use our sandbox environment and Merchant Portal to safely conduct UAT testing on a list of mandatory testing scenarios.
- Access your Integration Checklist page inside the Merchant Portal.
- Complete all mandatory testing scenarios listed in the checklist.
- After all required tests have been passed, sign the UAT Sign-Off Report in the Merchant Portal.
- Complete the Devsite Testing through the Merchant Portal to ensure compliance with Bank Indonesia SNAP standards.
UAT Testing Script
Use our specialized UAT testing suite to save days of debugging.
To speed up your integration, we have provided an automated test suite. It takes under 15 minutes to run your integration against our test scenarios. Check out the Github repo for more instructions
Step 10 : Submit testing documents & apply for production
As part of regulatory compliance, merchants are required to submit UAT testing documents to meet Bank Indonesia's requirements. After completing sandbox testing, follow these steps to move to production:
Generate production keys
Create your production private and public keys, follow this instruction: Authentication - Production Credential.Complete your UAT testing checklist
Confirm that you have completed all testing scenarios from our Merchant Portal.Fill out your Production Submission form
Follow the instructions inside our Merchant Portal to apply for production credentials. We will process your application in 1-2 days.Obtain production credentials
Once approved, you will receive your production credentials such as: Merchant ID, Client ID known as X-PARTNER-ID, and Client Secret.
Testing in the Production Environment
Configure the production environment
Update your application settings to switch from the sandbox environment to the production environment by using the correct production API endpoints and credentials.Test using production credentials
Download the Prod E2E Test Verification template in the Merchant Portal and start production testing as instructed. Upload the test results through the Merchant Portal.Receive live payments
After receiving all approvals, your DANA integration will be activated and ready for receive live payments from your customers.
Ready to submit testing documents?
Access our merchant portal for detailed guide to start receiving live payments
Step 1 : Library Installation
Visit our Libraries & Plugins guide for detailed information on our SDK.
DANA provides server-side API libraries for several programming languages, available through common package managers, for easier installation and version management. Follow the guide below to install our library:
Requirements
- Python 3.9.1+
- Your testing credentials from the merchant portal.
Installation
Install using pip or visit our Githubpip install dana-python
Set up the env
PRIVATE_KEY or PRIVATE_KEY_PATH        # Your private key
ORIGIN                                 # Your application's origin URL
X_PARTNER_ID                           # clientId provided during onboarding
ENV                                    # DANA's environment either 'sandbox' or 'production'
Obtaining merchant credentials: Authentication
Import Package
import dana.widget.v1
Step 2 : Initialize the library
Visit our Authentication guide to learn about the authentication process when not using our Library.
Follow the guide below to initialize the library
import os
from dana.utils.snap_configuration import SnapConfiguration, AuthSettings, Env

configuration = SnapConfiguration(
    api_key=AuthSettings(
        PRIVATE_KEY=os.environ.get("PRIVATE_KEY"), # obtained from Merchant Portal
        ORIGIN=os.environ.get("ORIGIN"), # Origin domain
        X_PARTNER_ID=os.environ.get("X_PARTNER_ID"), # known as clientId
        ENV=Env.SANDBOX # environment either 'sandbox' or 'production'
    )
)
Step 3 : Bind to DANA Account
To bind a DANA Account, you first generate the binding deeplink/redirect URL, open it to hand off the user to the DANA App to complete authorization, then return the user to your App via your redirectUrl. The flow is as follows:
Call the Deeplink Binding to generate the redirect URL for DANA account binding. If you already have the user’s phone number and want to use Seamless Binding, include seamlessData in the request so the user can skip manual input. If you don’t provide seamlessData, DANA will use Normal Binding and ask the user to enter their phone number.
from dana.widget.v1.models.oauth2_url_data import Oauth2UrlData
from dana.widget.v1.util import Util
from dana.widget.v1.enum import Mode

private_key = os.environ.get(PRIVATE_KEY)

# Set up OAuth2 URL data
oauth2_url_data = Oauth2UrlData(
    external_id=external_id,
    merchant_id=os.environ.get(MERCHANT_ID),  # from env variable
    redirect_url=https://google.com,
    mode=Mode.DEEPLINK # the default mode is API if not set
)

# You can set additional fields as needed
oauth2_url_data.seamless_data = {
    mobileNumber: 08787584xxxx  # Optional data for seamless login
}

# Generate the OAuth URL
oauth_url = Util.generate_oauth_url(oauth2_url_data, private_key)

# You can redirect the user to this URL to start the OAuth flow
print(f"Generated OAuth URL: {oauth_url}")
Open the Deeplink/redirect URL using the OS/native browser so universal links and deeplinks can correctly hand off to the DANA App.
If you must use an in-app WebView, intercept DANA deeplinks/universal links and open them externally (don’t let the WebView load them as normal pages). Allowlist:
danaid://https://link.dana.idhttps://m.dana.idhttps://danaid.link
Implementation tips:
- Android WebView: implement both
shouldOverrideUrlLoadingvariants, open withIntent(Intent.ACTION_VIEW, uri), then returntrue. - React Native WebView: use
onShouldStartLoadWithRequest, callLinking.openURL(req.url)for allowlisted URLs /intent://, then returnfalse. - Flutter WebView: listen to URL changes, stop navigation for allowlisted URLs, then launch via OS.
- Web redirects: prefer a user click on an
<a href="...">link; if issues occur withwindow.open/window.location.href, switch to a click based redirect.
If you still encounter WebView or web redirect issues, refer to: Deeplink Binding and Payment
After authorization, DANA redirects the user to the merchant’s redirectUrl with an authCode. This authCode is valid for 10 minutes, exchange it immediately for an access token via the Apply Token API.
https://www.merchant.com/oauth/callback?responseCode=2001000&responseMessage=Successful&authCode=xxx&state=2345555
Step 4 : Exchange the authCode into accessToken
After obtaining the authCode, exchange it for an accessToken using the Apply Token API. The returned accessToken and refreshToken both have a 3-year validity period. Once expired, users must rebind their DANA account.
from dana.widget.v1.models.apply_token_authorization_code_request import ApplyTokenAuthorizationCodeRequest
import os
from dana.utils.snap_configuration import SnapConfiguration, AuthSettings, Env
from dana.widget.v1 import WidgetApi
from dana.widget.v1.models.ApplyTokenRequest import ApplyTokenRequest
from dana.api_client import ApiClient
from dana.rest import ApiException
from pprint import pprint

# configuration and ApiClient object can be used for multiple operations
# They should be singleton through the application lifecycle
configuration = SnapConfiguration(
    // .. initialize client with authentication
    )
)

with ApiClient(configuration) as api_client:
    api_instance = WidgetApi(api_client)
    apply_token_request = ApplyTokenAuthorizationCodeRequest(
    # Fill in required fields here, refer to Apply Token API Detail.
    )

    try:
        api_response = api_instance.apply_token(apply_token_request)
        print("The response of WidgetApi->apply_token:\n")
        pprint(api_response)
    except Exception as e:
        print("Exception when calling WidgetApi->apply_token: %s\n" % e)
Step 5 : Use the Direct Debit Payment API to get a hosted checkout URL
Use the Direct Debit Payment API to create new payment requests which will then return the Checkout URL of the hosted payment page.
To create a new order, make a POST request to the Direct Debit Payment API:
import os
from dana.utils.snap_configuration import SnapConfiguration, AuthSettings, Env
from dana.widget.v1 import WidgetApi
from dana.widget.v1.models.WidgetPaymentRequest import WidgetPaymentRequest
from dana.api_client import ApiClient
from dana.rest import ApiException
from pprint import pprint

# configuration and ApiClient object can be used for multiple operations
# They should be singleton through the application lifecycle
configuration = SnapConfiguration(
    // .. initialize client with authentication
    )
)

with ApiClient(configuration) as api_client:
    api_instance = WidgetApi(api_client)
    widget_payment_request = WidgetPaymentRequest(
    # Fill in required fields here, refer to Direct Debit Payment API Detail.
    )

    try:
        api_response = api_instance.widget_payment(widget_payment_request)
        print("The response of WidgetApi->widget_payment:\n")
        pprint(api_response)
    except Exception as e:
        print("Exception when calling WidgetApi->widget_payment: %s\n" % e)
// .. initialize client with authentication

const request: WidgetPaymentRequest = {
    // Fill in required fields here, refer to Direct Debit Payment API Detail
};

const response: WidgetPaymentResponse = await WidgetApi.widgetPayment(request);
If successful, the response will include the URL for the DANA's payment page. For example:
Content-Type: application/json
X-TIMESTAMP: 2020-12-23T08:31:11+07:00
{
  "responseCode": "2005400", // Refer to response code list
  "responseMessage": "Successful", // Refer to response code list
  "referenceNo": "2020102977770000000009", // Transaction identifier on DANA system
  "partnerReferenceNo": "2020102900000000000001", // Transaction identifier on partner system
  "webRedirectUrl": "https://pjsp.com/universal?bizNo=REF993883&...",
  "additionalInfo":{}
}
Step 6 : Access DANA's page by hitting Apply OTT API
To access DANA's payment page, convert the user's access token to a one-time token (OTT) via the Apply OTT API. This token has a 10-minute expiration period and can be used only once.
import os
from dana.utils.snap_configuration import SnapConfiguration, AuthSettings, Env
from dana.widget.v1 import WidgetApi
from dana.widget.v1.models.ApplyOTTRequest import ApplyOTTRequest
from dana.api_client import ApiClient
from dana.rest import ApiException
from pprint import pprint

# configuration and ApiClient object can be used for multiple operations
# They should be singleton through the application lifecycle
configuration = SnapConfiguration(
    // .. initialize client with authentication
    )
)

with ApiClient(configuration) as api_client:
    api_instance = WidgetApi(api_client)
    apply_ott_request = ApplyOTTRequest(
    # Fill in required fields here, refer to Apply OTT API Detail.
    )

    try:
        api_response = api_instance.apply_ott(apply_ott_request)
        print("The response of WidgetApi->apply_ott:\n")
        pprint(api_response)
    except Exception as e:
        print("Exception when calling WidgetApi->apply_ott: %s\n" % e)
Step 7 : Redirect to DANA's checkout page
Generate a payment URL by combining the webRedirectUrl from the Direct Debit Payment API with an OTT token from the Apply OTT API.
from dana.widget.v1.util import Util
from dana.widget.v1.models.widget_payment_response import WidgetPaymentResponse
from dana.widget.v1.models.apply_ott_response import ApplyOTTResponse

# Build the complete payment URL
widget_payment_response = WidgetPaymentResponse()
apply_ott_response = ApplyOTTResponse()
payment_url = Util.generate_complete_payment_url(widget_payment_response, apply_ott_response)

# Redirect the user to this URL to complete the payment
print(f"Redirect user to: {payment_url}")
Optional Query Order Status, Cancel Order, Refund Order, Balance Inquiry, and Query User Profile
There are additional APIs available to enhance your integration process:
- Query Payment API - Use this API to inquire the latest status of a payment request.
- Cancel Order API - For unpaid orders or those paid within 24 hours, a full refund returns to the customer's original payment source.
- Refund Order API - Process refunds for completed orders. You can trigger a refund request on behalf of the customer using this API, who will then process the refund through DANA.
- Balance Inquiry API - Implement this API to verify the customer's balance before order creation. Disabling payment methods with insufficient funds will increase your order success rate.
- Query User Profile API - In order to obtain the user's profile information including DANA balance (unit in IDR), masked DANA phone number, KYC status or One Time Token (OTT).
import os
from dana.utils.snap_configuration import SnapConfiguration, AuthSettings, Env
from dana.widget.v1 import WidgetApi
from dana.widget.v1.models.QueryPaymentRequest import QueryPaymentRequest
from dana.api_client import ApiClient
from dana.rest import ApiException
from pprint import pprint

# configuration and ApiClient object can be used for multiple operations
# They should be singleton through the application lifecycle
configuration = SnapConfiguration(
    // .. initialize client with authentication
    )
)

with ApiClient(configuration) as api_client:
    api_instance = WidgetApi(api_client)
    query_payment_request = QueryPaymentRequest(
    # Fill in required fields here, refer to Query Payment API Detail.
    )

    try:
        api_response = api_instance.query_payment(query_payment_request)
        print("The response of WidgetApi->query_payment:\n")
        pprint(api_response)
    except Exception as e:
        print("Exception when calling WidgetApi->query_payment: %s\n" % e)
import os
from dana.utils.snap_configuration import SnapConfiguration, AuthSettings, Env
from dana.widget.v1 import WidgetApi
from dana.widget.v1.models.CancelOrderRequest import CancelOrderRequest
from dana.api_client import ApiClient
from dana.rest import ApiException
from pprint import pprint

# configuration and ApiClient object can be used for multiple operations
# They should be singleton through the application lifecycle
configuration = SnapConfiguration(
    // .. initialize client with authentication
    )
)

with ApiClient(configuration) as api_client:
    api_instance = WidgetApi(api_client)
    cancel_order_request = CancelOrderRequest(
    # Fill in required fields here, refer to Cancel Order API Detail.
    )

    try:
        api_response = api_instance.cancel_order(cancel_order_request)
        print("The response of WidgetApi->cancel_order:\n")
        pprint(api_response)
    except Exception as e:
        print("Exception when calling WidgetApi->cancel_order: %s\n" % e)
import os
from dana.utils.snap_configuration import SnapConfiguration, AuthSettings, Env
from dana.widget.v1 import WidgetApi
from dana.widget.v1.models.RefundOrderRequest import RefundOrderRequest
from dana.api_client import ApiClient
from dana.rest import ApiException
from pprint import pprint

# configuration and ApiClient object can be used for multiple operations
# They should be singleton through the application lifecycle
configuration = SnapConfiguration(
    // .. initialize client with authentication
    )
)

with ApiClient(configuration) as api_client:
    api_instance = WidgetApi(api_client)
    refund_order_request = RefundOrderRequest(
    # Fill in required fields here, refer to Refund Order API Detail.
    )

    try:
        api_response = api_instance.refund_order(refund_order_request)
        print("The response of WidgetApi->refund_order:\n")
        pprint(api_response)
    except Exception as e:
        print("Exception when calling WidgetApi->refund_order: %s\n" % e)
import os
from dana.utils.snap_configuration import SnapConfiguration, AuthSettings, Env
from dana.widget.v1 import WidgetApi
from dana.widget.v1.models.BalanceInquiryRequest import BalanceInquiryRequest
from dana.api_client import ApiClient
from dana.rest import ApiException
from pprint import pprint

# configuration and ApiClient object can be used for multiple operations
# They should be singleton through the application lifecycle
configuration = SnapConfiguration(
    // .. initialize client with authentication
    )
)

with ApiClient(configuration) as api_client:
    api_instance = WidgetApi(api_client)
    balance_inquiry_request = BalanceInquiryRequest(
    # Fill in required fields here, refer to Balance Inquiry API Detail.
    )

    try:
        api_response = api_instance.balance_inquiry(balance_inquiry_request)
        print("The response of WidgetApi->balance_inquiry:\n")
        pprint(api_response)
    except Exception as e:
        print("Exception when calling WidgetApi->balance_inquiry: %s\n" % e)
import os
from dana.utils.snap_configuration import SnapConfiguration, AuthSettings, Env
from dana.widget.v1 import WidgetApi
from dana.widget.v1.models.QueryUserProfileRequest import QueryUserProfileRequest
from dana.api_client import ApiClient
from dana.rest import ApiException
from pprint import pprint

# configuration and ApiClient object can be used for multiple operations
# They should be singleton through the application lifecycle
configuration = SnapConfiguration(
    // .. initialize client with authentication
    )
)

with ApiClient(configuration) as api_client:
    api_instance = WidgetApi(api_client)
    query_user_profile_request = QueryUserProfileRequest(
    # Fill in required fields here, refer to Query User Profile API Detail.
    )

    try:
        api_response = api_instance.query_user_profile(query_user_profile_request)
        print("The response of WidgetApi->query_user_profile:\n")
        pprint(api_response)
    except Exception as e:
  print("Exception when calling WidgetApi->query_user_profile: %s\n" % e)
Step 8 : Receive Payment Outcome
After a successful payment:
-
Notification: The user will be redirected to your specified Redirect URL, which you can configure using the
urlParamsparameter in the Direct Debit Payment API request, the redirection URL has a format like:https:xxx?originalReferenceNo=xxx&originalPartnerReferenceNo=xxx&merchantId=xxxx&status=xxx- merchant redirect URL: set on
urlParams.url - originalReferenceNo: Original transaction identifier on DANA system
- originalPartnerReferenceNo: Original transaction identifier on partner system
- merchantId: Merchant identifier that is unique per each merchant
- status: Payment transaction in DANA side
- Example:
https://www.merchantUrl.com/result/?originalReferenceNo=20250613111212800100166070954004283&originalPartnerReferenceNo=8562466e47144b5f82c003b47ae3c474&merchantId=216620000020928274717&status=SUCCESS
- merchant redirect URL: set on
-
[Optional] Finish Notify: In case you add
urlParams.type = NOTIFICATION, DANA will send payment notifications to your Notification URL via the Finish Notify API. Configure your notification endpoint with the ASPI-mandated path format:/v1.0/debit/notify.
Construction
WebhookParser(public_key: str = None, public_key_path: str = None)
Request
| Parameter | Type | Remarks |
|---|---|---|
| httpMethod | string | The HTTP method of the incoming webhook request e.g., POST |
| relative_path_url | string | The relative URL path of the webhook endpoint that received the notification e.g /v1.0/debit/notify |
| headers | map[string]string | A map containing the HTTP request headers. This map must include X-SIGNATURE and X-TIMESTAMP headers provided by DANA for signature verification |
| body | string | The raw JSON string payload from the webhook request body |
Method
parse_webhook(http_method: str, relative_path_url: str, headers: dict, body: str) -> FinishNotify
Request
| Parameter | Type | Remarks |
|---|---|---|
| httpMethod | string | The HTTP method of the incoming webhook request e.g., POST |
| relative_path_url | string | The relative URL path of the webhook endpoint that received the notification e.g /v1.0/debit/notify |
| headers | map[string]string | A map containing the HTTP request headers. This map must include X-SIGNATURE and X-TIMESTAMP headers provided by DANA for signature verification |
| body | string | The raw JSON string payload from the webhook request body |
-
Returns:
FinishNotifyRequestmodel with parsed data -
Raises:
ValueErrorif signature verification fails or the payload is invalid.Security Notes
- Always use the official public key provided by DANA for webhook verification.
- Reject any webhook requests that fail signature verification or have malformed payloads.
- Never trust webhook data unless it passes verification.
Webhook Finish Notifyimport os
from dana.webhook import WebhookParser
# You can provide the DANA_PUBLIC_KEY or DANA_PUBLIC_KEY_PATH
# The parser will prioritize DANA_PUBLIC_KEY_PATH if both are provided.
http_method = "POST"
relative_path_url = "/v1.0/debit/notify"
headers = {
"X-SIGNATURE": "<signature-from-header>",
"X-TIMESTAMP": "<timestamp-from-header>"
}
body = '{"original_partner_reference_no": "123...", ...}' # Raw JSON string from request body
parser = WebhookParser(public_key_path=os.getenv("DANA_PUBLIC_KEY_PATH"))
try:
finish_notify = parser.parse_webhook(
http_method=http_method,
relative_path_url=relative_path_url,
headers=headers,
body=body
)
print(finish_notify.original_partner_reference_no)
except ValueError as e:
print(f"Webhook verification failed: {e}")For detailed example, please refer to the following resource: Example Webhook.
Example of a successful payment webhook payload:
Example of a successful Finish Notify:Content-type: application/json
X-TIMESTAMP: 2020-12-23T07:44:16+07:00
{
"responseCode": "2005600",
"responseMessage": "Successful"
}
Additional Enum Configuration
The library provides several enums (enumerations) to represent a fixed set of constant values, ensuring consistency and reducing errors during integration.
from dana.widget.v1.enum import *
# Example of using enum
enum_value = ServiceType.PARKING
The following enums are available in the Library DANA Widget:
- ServiceType
- ServiceScenario
- PromoType
- AcquirementStatus
- Mode
- ResourceType
- ResultStatus
- SourcePlatform
- TerminalType
- OrderTerminalType
- PayMethod
- PayOption
- Type
Optional Revoke DANA's user account
Use the Account Unbinding API to remove the connection between your platform and a user's DANA account. For specific users, contact DANA directly.
import os
from dana.utils.snap_configuration import SnapConfiguration, AuthSettings, Env
from dana.widget.v1 import WidgetApi
from dana.widget.v1.models.AccountUnbindingRequest import AccountUnbindingRequest
from dana.api_client import ApiClient
from dana.rest import ApiException
from pprint import pprint
# configuration and ApiClient object can be used for multiple operations
# They should be singleton through the application lifecycle
configuration = SnapConfiguration(
// .. initialize client with authentication
)
)
with ApiClient(configuration) as api_client:
api_instance = WidgetApi(api_client)
account_unbinding_request = AccountUnbindingRequest(
# Fill in required fields here, refer to Account Unbinding API Detail.
)
try:
api_response = api_instance.account_unbinding(account_unbinding_request)
print("The response of WidgetApi->account_unbinding:\n")
pprint(api_response)
except Exception as e:
print("Exception when calling WidgetApi->account_unbinding: %s\n" % e)
Step 9 : Test using our automated test suite
Visit our Scenario Testing guide for detailed information on testing requirements.
We are required by local regulators to ensure your integration works correctly across all critical use cases. Use our sandbox environment and Merchant Portal to safely conduct UAT testing on a list of mandatory testing scenarios.
To complete our mandatory testing requirements, follow these steps:
- Access your Integration Checklist page inside the Merchant Portal.
- Complete all mandatory testing scenarios listed in the checklist.
- After all required tests have been passed, sign the UAT Sign-Off Report in the Merchant Portal.
- Complete the Devsite Testing through the Merchant Portal to ensure compliance with Bank Indonesia SNAP standards.
UAT Testing Script
Use our specialized UAT testing suite to save days of debugging.
To speed up your integration, we have provided an automated test suite. It takes under 15 minutes to run your integration against our test scenarios. Check out the Github repo for more instructions
Step 10 : Submit testing documents & apply for production
As part of regulatory compliance, merchants are required to submit UAT testing documents to meet Bank Indonesia's requirements. After completing sandbox testing, follow these steps to move to production:
Generate production keys
Create your production private and public keys, follow this instruction: Authentication - Production Credential.Complete your UAT testing checklist
Confirm that you have completed all testing scenarios from our Merchant Portal.Fill out your Production Submission form
Follow the instructions inside our Merchant Portal to apply for production credentials. We will process your application in 1-2 days.Obtain production credentials
Once approved, you will receive your production credentials such as: Merchant ID, Client ID known as X-PARTNER-ID, and Client Secret.
Testing in the Production Environment
Configure the production environment
Update your application settings to switch from the sandbox environment to the production environment by using the correct production API endpoints and credentials.Test using production credentials
Download the Prod E2E Test Verification template in the Merchant Portal and start production testing as instructed. Upload the test results through the Merchant Portal.Receive live payments
After receiving all approvals, your DANA integration will be activated and ready for receive live payments from your customers.
Ready to submit testing documents?
Access our merchant portal for detailed guide to start receiving live payments
Step 1 : Library Installation
Visit our Libraries & Plugins guide for detailed information on our SDK.
DANA provides server-side API libraries for several programming languages, available through common package managers, for easier installation and version management. Follow the guide below to install our library:
Requirements
- go.mod
- go.sum file
- Your testing credentials from the merchant portal.
Installation
Install or visit our Githubgo get github.com/dana-id/dana-go/v2
Set up the env
PRIVATE_KEY or PRIVATE_KEY_PATH # Your private key
ORIGIN # Your application's origin URL
X_PARTNER_ID # clientId provided during onboarding
ENV # DANA's environment either 'sandbox' or 'production'
Obtaining merchant credentials: Authentication
Import Package
import (
widget "github.com/dana-id/dana-go/widget/v1"
)
Step 2 : Initialize the library
Visit our Authentication guide to learn about the authentication process when not using our Library.
Follow the guide below to initialize the library
package main
import (
"context"
"fmt"
"os"
dana "github.com/dana-id/dana-go"
"github.com/dana-id/dana-go/config"
widget "github.com/dana-id/dana-go/widget/v1"
)
func main() {
configuration := config.NewConfiguration()
// Set API keys
configuration.APIKey = &config.APIKey{
ENV: config.ENV_SANDBOX, // environment either 'sandbox' or 'production'
X_PARTNER_ID: os.Getenv("X_PARTNER_ID"), // known as clientId
PRIVATE_KEY: os.Getenv("PRIVATE_KEY"), // obtained from Merchant Portal
ORIGIN: os.Getenv("ORIGIN"), // Origin domain
// PRIVATE_KEY_PATH: os.Getenv("PRIVATE_KEY_PATH"),
}
apiClient := dana.NewAPIClient(configuration)
}
Step 3 : Bind to DANA Account
To bind a DANA Account, you first generate the binding deeplink/redirect URL, open it to hand off the user to the DANA App to complete authorization, then return the user to your App via your redirectUrl. The flow is as follows:
Call the Deeplink Binding to generate the redirect URL for DANA account binding. If you already have the user’s phone number and want to use Seamless Binding, include seamlessData in the request so the user can skip manual input. If you don’t provide seamlessData, DANA will use Normal Binding and ask the user to enter their phone number.
package main
import (
"fmt"
"github.com/dana-team/dana-go-api-client/widget/v1"
"github.com/dana-team/dana-go-api-client/widget/v1/model"
)
func main() {
// Set up OAuth2 URL data
oauth2UrlData := &model.Oauth2UrlData{
RedirectUrl: "https://google.com",
MerchantId: merchantId,
SeamlessData: map[string]interface{}{
"mobileNumber": "087875849373",
},
}
// Generate the OAuth URL
oauthUrl := widget.GenerateOauthUrl(oauth2UrlData, privateKey)
fmt.Println("Generated OAuth URL:", oauthUrl)
}
Open the Deeplink/redirect URL using the OS/native browser so universal links and deeplinks can correctly hand off to the DANA App.
If you must use an in-app WebView, intercept DANA deeplinks/universal links and open them externally (don’t let the WebView load them as normal pages). Allowlist:
danaid://https://link.dana.idhttps://m.dana.idhttps://danaid.link
Implementation tips:
- Android WebView: implement both
shouldOverrideUrlLoadingvariants, open withIntent(Intent.ACTION_VIEW, uri), then returntrue. - React Native WebView: use
onShouldStartLoadWithRequest, callLinking.openURL(req.url)for allowlisted URLs /intent://, then returnfalse. - Flutter WebView: listen to URL changes, stop navigation for allowlisted URLs, then launch via OS.
- Web redirects: prefer a user click on an
<a href="...">link; if issues occur withwindow.open/window.location.href, switch to a click based redirect.
If you still encounter WebView or web redirect issues, refer to: Deeplink Binding and Payment
After authorization, DANA redirects the user to the merchant’s redirectUrl with an authCode. This authCode is valid for 10 minutes, exchange it immediately for an access token via the Apply Token API.
https://www.merchant.com/oauth/callback?responseCode=2001000&responseMessage=Successful&authCode=xxx&state=2345555
Step 4 : Exchange the authCode into accessToken
After obtaining the authCode, exchange it for an accessToken using the Apply Token API. The returned accessToken and refreshToken both have a 3-year validity period. Once expired, users must rebind their DANA account.
package main
import (
"context"
"fmt"
"os"
dana "github.com/dana-id/dana-go"
"github.com/dana-id/dana-go/config"
widget "github.com/dana-id/dana-go/widget/v1"
)
func main() {
// ... define authentication
request := widget.ApplyTokenRequest{
// Fill in required fields here, refer to Apply Token API Detail
}
_, r, err := apiClient.WidgetAPI.ApplyToken(context.Background()).ApplyTokenRequest(request).Execute()
if err != nil {
fmt.Fprintf(os.Stderr, "Error when calling `WidgetAPI.ApplyToken``: %v\n", err)
fmt.Fprintf(os.Stderr, "Full HTTP response: %v\n", r)
}
// response from `ApplyToken`: ApplyTokenResponse
fmt.Fprintf(os.Stdout, "Response from `WidgetAPI.ApplyToken`: %v\n", r.Body)
}
Step 5 : Use the Direct Debit Payment API to get a hosted checkout URL
Use the Direct Debit Payment API to create new payment requests which will then return the Checkout URL of the hosted payment page.
To create a new order, make a POST request to the Direct Debit Payment API:
package main
import (
"context"
"fmt"
"os"
dana "github.com/dana-id/dana-go"
"github.com/dana-id/dana-go/config"
widget "github.com/dana-id/dana-go/widget/v1"
)
func main() {
// ... define authentication
request := widget.WidgetPaymentRequest{
// Fill in required fields here, refer to Direct Debit Payment API Detail
}
_, r, err := apiClient.WidgetAPI.WidgetPayment(context.Background()).WidgetPaymentRequest(request).Execute()
if err != nil {
fmt.Fprintf(os.Stderr, "Error when calling `WidgetAPI.WidgetPayment``: %v\n", err)
fmt.Fprintf(os.Stderr, "Full HTTP response: %v\n", r)
}
// response from `WidgetPayment`: WidgetPaymentResponse
fmt.Fprintf(os.Stdout, "Response from `WidgetAPI.WidgetPayment`: %v\n", r.Body)
}
If successful, the response will include the URL for the DANA's payment page. For example:
Content-Type: application/json
X-TIMESTAMP: 2020-12-23T08:31:11+07:00
{
"responseCode": "2005400", // Refer to response code list
"responseMessage": "Successful", // Refer to response code list
"referenceNo": "2020102977770000000009", // Transaction identifier on DANA system
"partnerReferenceNo": "2020102900000000000001", // Transaction identifier on partner system
"webRedirectUrl": "https://pjsp.com/universal?bizNo=REF993883&...",
"additionalInfo":{}
}
Step 6 : Access DANA's page by hitting Apply OTT API
To access DANA's payment page, convert the user's access token to a one-time token (OTT) via the Apply OTT API. This token has a 10-minute expiration period and can be used only once.
package main
import (
"context"
"fmt"
"os"
dana "github.com/dana-id/dana-go"
"github.com/dana-id/dana-go/config"
widget "github.com/dana-id/dana-go/widget/v1"
)
func main() {
// ... define authentication
request := widget.ApplyOTTRequest{
// Fill in required fields here, refer to Apply OTT API Detail
}
_, r, err := apiClient.WidgetAPI.ApplyOTT(context.Background()).ApplyOTTRequest(request).Execute()
if err != nil {
fmt.Fprintf(os.Stderr, "Error when calling `WidgetAPI.ApplyOTT``: %v\n", err)
fmt.Fprintf(os.Stderr, "Full HTTP response: %v\n", r)
}
// response from `ApplyOTT`: ApplyOTTResponse
fmt.Fprintf(os.Stdout, "Response from `WidgetAPI.ApplyOTT`: %v\n", r.Body)
}
Step 7 : Redirect to DANA’s checkout page
Generate a payment URL by combining the webRedirectUrl from the Direct Debit Payment API with an OTT token from the Apply OTT API.
package main
import (
"fmt"
"github.com/dana-team/dana-go-api-client/widget/v1"
"github.com/dana-team/dana-go-api-client/widget/v1/model"
)
func main() {
// Example response from createWidgetPayment
widgetPaymentResponse := &model.WidgetPaymentResponse{
WebRedirectUrl: "https://example.com/payment?token=abc123",
}
// This should be from createPayment Widget API
// Example response from applyOTT
applyOTTResponse := &model.ApplyOTTResponse{
UserResources: []model.UserResource{
{
Value: "ott_token_value",
},
},
}
// This should be from applyOTT Widget API
// Generate the payment URL
paymentUrl := widget.GenerateCompletePaymentUrl(widgetPaymentResponse, applyOTTResponse)
fmt.Println("Generated Complete Payment URL:", paymentUrl)
}
Optional Query Order Status, Cancel Order, Refund Order, Balance Inquiry, and Query User Profile
There are additional APIs available to enhance your integration process:
- Query Payment API - Use this API to inquire the latest status of a payment request.
- Cancel Order API - For unpaid orders or those paid within 24 hours, a full refund returns to the customer's original payment source.
- Refund Order API - Process refunds for completed orders. You can trigger a refund request on behalf of the customer using this API, who will then process the refund through DANA.
- Balance Inquiry API - Implement this API to verify the customer's balance before order creation. Disabling payment methods with insufficient funds will increase your order success rate.
- Query User Profile API - In order to obtain the user's profile information including DANA balance (unit in IDR), masked DANA phone number, KYC status or One Time Token (OTT).
package main
import (
"context"
"fmt"
"os"
dana "github.com/dana-id/dana-go"
"github.com/dana-id/dana-go/config"
widget "github.com/dana-id/dana-go/widget/v1"
)
func main() {
// ... define authentication
request := widget.QueryPaymentRequest{
// Fill in required fields here, refer to Query Payment API Detail,
}
_, r, err := apiClient.WidgetAPI.QueryPayment(context.Background()).QueryPaymentRequest(request).Execute()
if err != nil {
fmt.Fprintf(os.Stderr, "Error when calling `WidgetAPI.QueryPayment``: %v\n", err)
fmt.Fprintf(os.Stderr, "Full HTTP response: %v\n", r)
}
// response from `QueryPayment`: QueryPaymentResponse
fmt.Fprintf(os.Stdout, "Response from `WidgetAPI.QueryPayment`: %v\n", r.Body)
}
package main
import (
"context"
"fmt"
"os"
dana "github.com/dana-id/dana-go"
"github.com/dana-id/dana-go/config"
widget "github.com/dana-id/dana-go/widget/v1"
)
func main() {
// ... define authentication
request := widget.CancelOrderRequest{
// Fill in required fields here, refer to Cancel Order API Detail,
}
_, r, err := apiClient.WidgetAPI.CancelOrder(context.Background()).CancelOrderRequest(request).Execute()
if err != nil {
fmt.Fprintf(os.Stderr, "Error when calling `WidgetAPI.CancelOrder``: %v\n", err)
fmt.Fprintf(os.Stderr, "Full HTTP response: %v\n", r)
}
// response from `CancelOrder`: CancelOrderResponse
fmt.Fprintf(os.Stdout, "Response from `WidgetAPI.CancelOrder`: %v\n", r.Body)
}
package main
import (
"context"
"fmt"
"os"
dana "github.com/dana-id/dana-go"
"github.com/dana-id/dana-go/config"
widget "github.com/dana-id/dana-go/widget/v1"
)
func main() {
// ... define authentication
request := widget.RefundOrderRequest{
// Fill in required fields here, refer to Refund Order API Detail,
}
_, r, err := apiClient.WidgetAPI.RefundOrder(context.Background()).RefundOrderRequest(request).Execute()
if err != nil {
fmt.Fprintf(os.Stderr, "Error when calling `WidgetAPI.RefundOrder``: %v\n", err)
fmt.Fprintf(os.Stderr, "Full HTTP response: %v\n", r)
}
// response from `RefundOrder`: RefundOrderResponse
fmt.Fprintf(os.Stdout, "Response from `WidgetAPI.RefundOrder`: %v\n", r.Body)
}
package main
import (
"context"
"fmt"
"os"
dana "github.com/dana-id/dana-go"
"github.com/dana-id/dana-go/config"
widget "github.com/dana-id/dana-go/widget/v1"
)
func main() {
// ... define authentication
request := widget.BalanceInquiryRequest{
// Fill in required fields here, refer to Balance Inquiry API Detail,
}
_, r, err := apiClient.WidgetAPI.BalanceInquiry(context.Background()).BalanceInquiryRequest(request).Execute()
if err != nil {
fmt.Fprintf(os.Stderr, "Error when calling `WidgetAPI.BalanceInquiry``: %v\n", err)
fmt.Fprintf(os.Stderr, "Full HTTP response: %v\n", r)
}
// response from `BalanceInquiry`: BalanceInquiryResponse
fmt.Fprintf(os.Stdout, "Response from `WidgetAPI.BalanceInquiry`: %v\n", r.Body)
}
package main
import (
"context"
"fmt"
"os"
dana "github.com/dana-id/dana-go"
"github.com/dana-id/dana-go/config"
widget "github.com/dana-id/dana-go/widget/v1"
)
func main() {
// ... define authentication
request := widget.QueryUserProfileRequest{
// Fill in required fields here, refer to Query User Profile API Detail,
}
_, r, err := apiClient.WidgetAPI.QueryUserProfile(context.Background()).QueryUserProfileRequest(request).Execute()
if err != nil {
fmt.Fprintf(os.Stderr, "Error when calling `WidgetAPI.QueryUserProfile``: %v\n", err)
fmt.Fprintf(os.Stderr, "Full HTTP response: %v\n", r)
}
// response from `QueryUserProfile`: QueryUserProfileResponse
fmt.Fprintf(os.Stdout, "Response from `WidgetAPI.QueryUserProfile`: %v\n", r.Body)
}
Step 8 : Receive Payment Outcome
After a successful payment:
-
Notification: The user will be redirected to your specified Redirect URL, which you can configure using the
urlParamsparameter in the Direct Debit Payment API request, the redirection URL has a format like:https:xxx?originalReferenceNo=xxx&originalPartnerReferenceNo=xxx&merchantId=xxxx&status=xxx- merchant redirect URL: set on
urlParams.url - originalReferenceNo: Original transaction identifier on DANA system
- originalPartnerReferenceNo: Original transaction identifier on partner system
- merchantId: Merchant identifier that is unique per each merchant
- status: Payment transaction in DANA side
- Example:
https://www.merchantUrl.com/result/?originalReferenceNo=20250613111212800100166070954004283&originalPartnerReferenceNo=8562466e47144b5f82c003b47ae3c474&merchantId=216620000020928274717&status=SUCCESS
- merchant redirect URL: set on
-
[Optional] Finish Notify: In case you add
urlParams.type = NOTIFICATION, DANA will send payment notifications to your Notification URL via the Finish Notify API. Configure your notification endpoint with the ASPI-mandated path format:/v1.0/debit/notify.
Construction
func NewWebhookParser(publicKey *string, publicKeyPath *string) (*WebhookParser, error)
Request
| Parameter | Type | Remarks |
|---|---|---|
| publicKey | string | The DANA gateway's public key as a PEM formatted string. This is used if publicKeyPath is not provided or is empty |
| publicKeyPath | string | The file path to the DANA gateway's public key PEM file. If provided, this will be prioritized over the publicKey string |
- Returns: A pointer to a
WebhookParserinstance and an error if the public key is invalid.
Method
func (p *WebhookParser) ParseWebhook(httpMethod string, relativePathURL string, headers map[string]string, body string) (*model.FinishNotify, error)
Request
| Parameter | Type | Remarks |
|---|---|---|
| httpMethod | string | The HTTP method of the incoming webhook request e.g., http.MethodPost |
| relative_path_url | string | The relative URL path of the webhook endpoint that received the notification e.g /v1.0/debit/notify |
| headers | map[string]string | A map containing the HTTP request headers. This map must include X-SIGNATURE and X-TIMESTAMP headers provided by DANA for signature verification |
| body | string | The raw JSON string payload from the webhook request body |
- Return: A pointer to a
model.FinishNotifyRequeststruct containing the parsed and verified webhook data, or an error if parsing or signature verification fails.
Security Notes
- Always use the official public key provided by DANA for webhook verification. Store and load it securely.
- The
ParseWebhooksmethod handles both JSON parsing and cryptographic signature verification. If it returns an error, the payload should not be trusted.
package main
import (
"bytes"
"fmt"
"io"
"net/http"
"os"
webhook "github.com/dana-id/dana-go/webhook"
widget "github.com/dana-id/dana-go/widget/v1"
)
// This function would be your actual webhook handler in a real application.
func webhookNotificationHandler(req *http.Request) {
// 1. Initialize the WebhookParser
// You can provide the public key directly as a string or via a file path.
// The parser will prioritize publicKeyPath if both are provided.
// Option 1: Provide public key as a string
// danaPublicKeyPEM := os.Getenv("DANA_PUBLIC_KEY")
// parser, err := webhook.NewWebhookParser(&danaPublicKeyPEM, nil)
// Option 2: Provide path to public key file
danaPublicKeyPath := os.Getenv("DANA_PUBLIC_KEY_PATH") // e.g., "/path/to/your/dana_public_key.pem"
parser, err := webhook.NewWebhookParser(nil, &danaPublicKeyPath)
if err != nil {
fmt.Printf("Error creating WebhookParser: %v\n", err)
return
}
// 2. Extract data from the incoming HTTP Request
httpMethod := req.Method
relativePathUrl := "/v1.0/debit/notify"
// relativePathUrl := req.URL.Path // This should match the path DANA sends the webhook to for example: /v1.0/debit/notify
// Read the request body
bodyBytes, err := io.ReadAll(req.Body)
if err != nil {
fmt.Printf("Error reading request body: %v\n", err)
return
}
defer req.Body.Close() // Important to close the body
webhookBodyStr := string(bodyBytes)
// Log received data for debugging (optional)
fmt.Printf("Received webhook: Method=%s, Path=%s, Headers=%v, Body=%s\n",
httpMethod, relativePathUrl, req.Header, webhookBodyStr)
// 3. Parse and verify the webhook
parsedData, err := parser.ParseWebhook(
httpMethod,
relativePathUrl,
req.Header,
webhookBodyStr,
)
if err != nil {
fmt.Printf("Webhook parsing/verification failed: %v\n", err)
// IMPORTANT: If verification fails, do not trust the payload.
return
}
// 4. Use the parsed data
fmt.Printf("Webhook parsed successfully!\n")
fmt.Printf("Original Partner Reference No: %s\n", parsedData.OriginalPartnerReferenceNo)
fmt.Printf("Amount: %s %s\n", parsedData.Amount.Value, parsedData.Amount.Currency)
fmt.Printf("Status: %s\n", parsedData.LatestTransactionStatus)
// Access other fields from parsedData as needed
}
For detailed example, please refer to the following resource: Example Webhook.
Example of a successful payment webhook payload:
Content-type: application/json
X-TIMESTAMP: 2020-12-23T07:44:16+07:00
{
  "responseCode": "2005600",
  "responseMessage": "Successful"
}
Additional Enum Configuration
The library provides several enums (enumerations) to represent a fixed set of constant values, ensuring consistency and reducing errors during integration.
import widget "github.com/dana-id/dana-go/widget/v1"
ipg := string(widget.SOURCEPLATFORM_IPG_)
The following enums are available in the Library DANA Widget:
- acquirementStatus
- actorType
- orderTerminalType
- payMethod
- payOption
- promoType
- resourceType
- resultStatus
- serviceScenario
- serviceType
- sourcePlatform
- terminalType
- type
Optional Revoke DANA's user account
Use the Account Unbinding API to remove the connection between your platform and a user's DANA account. For specific users, contact DANA directly.
package main
import (
"context"
"fmt"
"os"
dana "github.com/dana-id/dana-go"
"github.com/dana-id/dana-go/config"
widget "github.com/dana-id/dana-go/widget/v1"
)
func main() {
// ... define authentication
request := widget.AccountUnbindingRequest{
// Fill in required fields here, refer to Account Unbinding API Detail,
}
_, r, err := apiClient.WidgetAPI.AccountUnbinding(context.Background()).AccountUnbindingRequest(request).Execute()
if err != nil {
fmt.Fprintf(os.Stderr, "Error when calling `WidgetAPI.AccountUnbinding``: %v\n", err)
fmt.Fprintf(os.Stderr, "Full HTTP response: %v\n", r)
}
// response from `AccountUnbinding`: AccountUnbindingResponse
fmt.Fprintf(os.Stdout, "Response from `WidgetAPI.AccountUnbinding`: %v\n", r.Body)
}
Step 9 : Test using our automated test suite
Visit our Scenario Testing guide for detailed information on testing requirements.
We are required by local regulators to ensure your integration works correctly across all critical use cases. Use our sandbox environment and Merchant Portal to safely conduct UAT testing on a list of mandatory testing scenarios.
To complete our mandatory testing requirements, follow these steps:
- Access your Integration Checklist page inside the Merchant Portal.
- Complete all mandatory testing scenarios listed in the checklist.
- After all required tests have been passed, sign the UAT Sign-Off Report in the Merchant Portal.
- Complete the Devsite Testing through the Merchant Portal to ensure compliance with Bank Indonesia SNAP standards.
UAT Testing Script
Use our specialized UAT testing suite to save days of debugging.
To speed up your integration, we have provided an automated test suite. It takes under 15 minutes to run your integration against our test scenarios. Check out the Github repo for more instructions
Step 10 : Submit testing documents & apply for production
As part of regulatory compliance, merchants are required to submit UAT testing documents to meet Bank Indonesia's requirements. After completing sandbox testing, follow these steps to move to production:
Generate production keys
Create your production private and public keys, follow this instruction: Authentication - Production Credential.Complete your UAT testing checklist
Confirm that you have completed all testing scenarios from our Merchant Portal.Fill out your Production Submission form
Follow the instructions inside our Merchant Portal to apply for production credentials. We will process your application in 1-2 days.Obtain production credentials
Once approved, you will receive your production credentials such as: Merchant ID, Client ID known as X-PARTNER-ID, and Client Secret.
Testing in the Production Environment
Configure the production environment
Update your application settings to switch from the sandbox environment to the production environment by using the correct production API endpoints and credentials.Test using production credentials
Download the Prod E2E Test Verification template in the Merchant Portal and start production testing as instructed. Upload the test results through the Merchant Portal.Receive live payments
After receiving all approvals, your DANA integration will be activated and ready for receive live payments from your customers.
Ready to submit testing documents?
Access our merchant portal for detailed guide to start receiving live payments
Step 1 : Library Installation
Visit our Libraries & Plugins guide for detailed information on our SDK.
DANA provides server-side API libraries for several programming languages, available through common package managers, for easier installation and version management. Follow the guide below to install our library:
Requirements
- PHP 7.4+, compatible with PHP 8.0.
- Your testing credentials from the merchant portal.
Installation
Install using composer or visit our Github- Using Composer
- Add the following code to
composer.json
- Add the following code to
{
"repositories": [
{
"type": "vcs",
"url": "https://github.com/dana-id/dana-php.git"
}
],
"require": {
"danaid/dana-php": "^2.0"
}
}
- Run
composer install
- Manual Installation
<?php
require_once('/path/to/DanaPhp/vendor/autoload.php');
Set up the env
PRIVATE_KEY or PRIVATE_KEY_PATH        # Your private key
ORIGIN                                 # Your application's origin URL
X_PARTNER_ID                           # clientId provided during onboarding
ENV                                    # DANA's environment either 'sandbox' or 'production'
Obtaining merchant credentials: Authentication
Import Package
use Dana\Widget\v1
Step 2 : Initialize the library
Visit our Authentication guide to learn about the authentication process when not using our Library.
Follow the guide below to initialize the library
<?php
use Dana\Configuration;
use Dana\Env;
use Dana\Widget\v1\Api\WidgetApi;
// Set up configuration with authentication settings
$configuration = new Configuration();
// The Configuration constructor automatically loads values from environment variables
// Choose one of PRIVATE_KEY or PRIVATE_KEY_PATH to set, if you set both, PRIVATE_KEY will be ignored
$configuration->setApiKey('PRIVATE_KEY', getenv('PRIVATE_KEY'));
// $configuration->setApiKey('PRIVATE_KEY_PATH', getenv('PRIVATE_KEY_PATH'));
$configuration->setApiKey('ORIGIN', getenv('ORIGIN'));
$configuration->setApiKey('X_PARTNER_ID', getenv('X_PARTNER_ID'));
$configuration->setApiKey('DANA_ENV', Env::SANDBOX);
// Choose one of ENV or DANA_ENV to set, if you set both, ENV will be ignored
// $configuration->setApiKey('ENV', Env::SANDBOX);
$apiInstance = new WidgetApi(
null, // this also can be set to custom http client which implements `GuzzleHttp\ClientInterface`
$configuration
);
Step 3 : Bind to DANA Account
To bind a DANA Account, you first generate the binding deeplink/redirect URL, open it to hand off the user to the DANA App to complete authorization, then return the user to your App via your redirectUrl. The flow is as follows:
Call the Deeplink Binding to generate the redirect URL for DANA account binding. If you already have the user’s phone number and want to use Seamless Binding, include seamlessData in the request so the user can skip manual input. If you don’t provide seamlessData, DANA will use Normal Binding and ask the user to enter their phone number.
<?php
use Dana\Widget\v1\Model\Oauth2UrlData;
use Dana\Widget\v1\Util\Util;
use Dana\Widget\v1\Enum\Mode;
// Set up OAuth2 URL data
$oauth2UrlData = new Oauth2UrlData();
$oauth2UrlData->setMode(Mode::DEEPLINK); // the default mode is API if not set
$oauth2UrlData->setRedirectUrl('https://google.com');
$oauth2UrlData->setMerchantId('merchant_id'); // from env variable
$oauth2UrlData->setExternalId('external_id');
$oauth2UrlData->setSeamlessData([
'mobileNumber' => '087875849373'
]);
// Generate the OAuth URL
$oauthUrl = Util::generateOauthUrl($oauth2UrlData, $privateKey, $privateKeyPath);
echo 'Generated OAuth URL: ' . $oauthUrl;
Open the Deeplink/redirect URL using the OS/native browser so universal links and deeplinks can correctly hand off to the DANA App.
If you must use an in-app WebView, intercept DANA deeplinks/universal links and open them externally (don’t let the WebView load them as normal pages). Allowlist:
danaid://https://link.dana.idhttps://m.dana.idhttps://danaid.link
Implementation tips:
- Android WebView: implement both
shouldOverrideUrlLoadingvariants, open withIntent(Intent.ACTION_VIEW, uri), then returntrue. - React Native WebView: use
onShouldStartLoadWithRequest, callLinking.openURL(req.url)for allowlisted URLs /intent://, then returnfalse. - Flutter WebView: listen to URL changes, stop navigation for allowlisted URLs, then launch via OS.
- Web redirects: prefer a user click on an
<a href="...">link; if issues occur withwindow.open/window.location.href, switch to a click based redirect.
If you still encounter WebView or web redirect issues, refer to: Deeplink Binding and Payment
After authorization, DANA redirects the user to the merchant’s redirectUrl with an authCode. This authCode is valid for 10 minutes, exchange it immediately for an access token via the Apply Token API.
https://www.merchant.com/oauth/callback?responseCode=2001000&responseMessage=Successful&authCode=xxx&state=2345555
Step 4 : Exchange the authCode into accessToken
After obtaining the authCode, exchange it for an accessToken using the Apply Token API. The returned accessToken and refreshToken both have a 3-year validity period. Once expired, users must rebind their DANA account.
<?php
use Dana\Configuration;
use Dana\Env;
use Dana\Widget\v1\Api\WidgetApi;
use Dana\Widget\v1\Model\ApplyTokenRequest;
// ... define authentication
$applyTokenRequest = ApplyTokenRequest();
try {
$result = $apiInstance->applyToken($applyTokenRequest);
print_r($result);
} catch (Exception $e) {
echo 'Exception when calling WidgetApi->applyToken: ', $e->getMessage(), PHP_EOL;
}
Step 5 : Use the Direct Debit Payment API to get a hosted checkout URL
Use the Direct Debit Payment API to create new payment requests which will then return the Checkout URL of the hosted payment page.
To create a new order, make a POST request to the Direct Debit Payment API:
<?php
use Dana\Configuration;
use Dana\Env;
use Dana\Widget\v1\Api\WidgetApi;
use Dana\Widget\v1\Model\WidgetPaymentRequest;
// ... define authentication
$widgetPaymentRequest = WidgetPaymentRequest();
try {
$result = $apiInstance->widgetPayment($widgetPaymentRequest);
print_r($result);
} catch (Exception $e) {
echo 'Exception when calling WidgetApi->widgetPayment: ', $e->getMessage(), PHP_EOL;
}
If successful, the response will include the URL for the DANA's payment page. For example:
Content-Type: application/json
X-TIMESTAMP: 2020-12-23T08:31:11+07:00
{
  "responseCode": "2005400", // Refer to response code list
  "responseMessage": "Successful", // Refer to response code list
  "referenceNo": "2020102977770000000009", // Transaction identifier on DANA system
  "partnerReferenceNo": "2020102900000000000001", // Transaction identifier on partner system
  "webRedirectUrl": "https://pjsp.com/universal?bizNo=REF993883&...",
  "additionalInfo":{}
}
Step 6 : Access DANA's page by hitting Apply OTT API
To access DANA's payment page, convert the user's access token to a one-time token (OTT) via the Apply OTT API. This token has a 10-minute expiration period and can be used only once.
<?php
use Dana\Configuration;
use Dana\Env;
use Dana\Widget\v1\Api\WidgetApi;
use Dana\Widget\v1\Model\ApplyOTTRequest;
// ... define authentication
$applyOTTRequest = ApplyOTTRequest();
try {
$result = $apiInstance->applyOTT($applyOTTRequest);
print_r($result);
} catch (Exception $e) {
echo 'Exception when calling WidgetApi->applyOTT: ', $e->getMessage(), PHP_EOL;
}
Step 7 : Redirect to DANA’s checkout page
Generate a payment URL by combining the webRedirectUrl from the Direct Debit Payment API with an OTT token from the Apply OTT API.
<?php
use Dana\Widget\v1\Model\WidgetPaymentResponse;
use Dana\Widget\v1\Model\ApplyOTTResponse;
use Dana\Widget\v1\Util\Util;
// Example response from createWidgetPayment
$widgetPaymentResponse = new WidgetPaymentResponse();
$widgetPaymentResponse->setWebRedirectUrl('https://example.com/payment?token=abc123');
// This should be from createPayment Widget API
// Example response from applyOTT
$applyOTTResponse = new ApplyOTTResponse();
$applyOTTResponse->setUserResources([
[
'value' => 'ott_token_value'
]
]);
// This should be from applyOTT Widget API
// Generate the payment URL
$paymentUrl = Util::generateCompletePaymentUrl($widgetPaymentResponse, $applyOTTResponse);
echo 'Generated Payment URL: ' . $paymentUrl;
Optional Query Order Status, Cancel Order, Refund Order, Balance Inquiry, and Query User Profile
There are additional APIs available to enhance your integration process:
- Query Payment API - Use this API to inquire the latest status of a payment request.
- Cancel Order API - For unpaid orders or those paid within 24 hours, a full refund returns to the customer's original payment source.
- Refund Order API - Process refunds for completed orders. You can trigger a refund request on behalf of the customer using this API, who will then process the refund through DANA.
- Balance Inquiry API - Implement this API to verify the customer's balance before order creation. Disabling payment methods with insufficient funds will increase your order success rate.
- Query User Profile API - In order to obtain the user's profile information including DANA balance (unit in IDR), masked DANA phone number, KYC status or One Time Token (OTT).
<?php
use Dana\Configuration;
use Dana\Env;
use Dana\Widget\v1\Api\WidgetApi;
use Dana\Widget\v1\Model\QueryPaymentRequest;
// ... define authentication
$queryPaymentRequest = QueryPaymentRequest();
try {
$result = $apiInstance->queryPayment($queryPaymentRequest);
print_r($result);
} catch (Exception $e) {
echo 'Exception when calling WidgetApi->queryPayment: ', $e->getMessage(), PHP_EOL;
}
<?php
use Dana\Configuration;
use Dana\Env;
use Dana\Widget\v1\Api\WidgetApi;
use Dana\Widget\v1\Model\CancelOrderRequest;
// ... define authentication
$cancelOrderRequest = CancelOrderRequest();
try {
$result = $apiInstance->cancelOrder($cancelOrderRequest);
print_r($result);
} catch (Exception $e) {
echo 'Exception when calling WidgetApi->cancelOrder: ', $e->getMessage(), PHP_EOL;
}
<?php
use Dana\Configuration;
use Dana\Env;
use Dana\Widget\v1\Api\WidgetApi;
use Dana\Widget\v1\Model\RefundOrderRequest;
// ... define authentication
$refundOrderRequest = RefundOrderRequest();
try {
$result = $apiInstance->refundOrder($refundOrderRequest);
print_r($result);
} catch (Exception $e) {
echo 'Exception when calling WidgetApi->refundOrder: ', $e->getMessage(), PHP_EOL;
}
<?php
use Dana\Configuration;
use Dana\Env;
use Dana\Widget\v1\Api\WidgetApi;
use Dana\Widget\v1\Model\BalanceInquiryRequest;
// ... define authentication
$balanceInquiryRequest = BalanceInquiryRequest();
try {
$result = $apiInstance->balanceInquiry($balanceInquiryRequest);
print_r($result);
} catch (Exception $e) {
echo 'Exception when calling WidgetApi->balanceInquiry: ', $e->getMessage(), PHP_EOL;
}
<?php
use Dana\Configuration;
use Dana\Env;
use Dana\Widget\v1\Api\WidgetApi;
use Dana\Widget\v1\Model\QueryUserProfileRequest;
// ... define authentication
$queryUserProfileRequest = QueryUserProfileRequest();
try {
$result = $apiInstance->queryUserProfile($queryUserProfileRequest);
print_r($result);
} catch (Exception $e) {
echo 'Exception when calling WidgetApi->queryUserProfile: ', $e->getMessage(), PHP_EOL;
}
Step 8 : Receive Payment Outcome
After a successful payment:
-
Notification: The user will be redirected to your specified Redirect URL, which you can configure using the
urlParamsparameter in the Direct Debit Payment API request, the redirection URL has a format like:https:xxx?originalReferenceNo=xxx&originalPartnerReferenceNo=xxx&merchantId=xxxx&status=xxx- merchant redirect URL: set on
urlParams.url - originalReferenceNo: Original transaction identifier on DANA system
- originalPartnerReferenceNo: Original transaction identifier on partner system
- merchantId: Merchant identifier that is unique per each merchant
- status: Payment transaction in DANA side
- Example:
https://www.merchantUrl.com/result/?originalReferenceNo=20250613111212800100166070954004283&originalPartnerReferenceNo=8562466e47144b5f82c003b47ae3c474&merchantId=216620000020928274717&status=SUCCESS
- merchant redirect URL: set on
-
[Optional] Finish Notify: In case you add
urlParams.type = NOTIFICATION, DANA will send payment notifications to your Notification URL via the Finish Notify API. Configure your notification endpoint with the ASPI-mandated path format:/v1.0/debit/notify.
Construction
public function __construct(?string $publicKey = null, ?string $publicKeyPath = null)
Request
| Parameter | Type | Remarks |
|---|---|---|
| publicKey | string | The DANA gateway's public key as a PEM formatted string. This is used if publicKeyPath is not provided or is empty |
| publicKeyPath | string | The file path to the DANA gateway's public key PEM file. If provided, this will be prioritized over the publicKey string |
- Throws:
\InvalidArgumentExceptionif neither publicKey nor publicKeyPath is provided or if the public key cannot be loaded
Method
public function parseWebhook(string $httpMethod, string $relativePathURL, array $headers, string $body): \Dana\Webhook\v1\Model\FinishNotifyRequest
Request
| Parameter | Type | Remarks |
|---|---|---|
| httpMethod | string | The HTTP method of the incoming webhook request e.g., POST |
| relative_path_url | string | The relative URL path of the webhook endpoint that received the notification e.g /v1.0/debit/notify |
| headers | array | An array containing the HTTP request headers. This map must include X-SIGNATURE and X-TIMESTAMP headers provided by DANA for signature verification |
| body | string | The raw JSON string payload from the webhook request body |
- Returns: An instance of \Dana\Webhook\v1\Model\FinishNotifyRequest containing the parsed and verified webhook data.
- Throws:
\InvalidArgumentExceptionif required parameters are missing or\RuntimeExceptionif signature verification fails.
Security Notes
- Always use the official public key provided by DANA for webhook verification. Store and load it securely.
- The
parseWebhookmethod handles both JSON parsing and cryptographic signature verification. If it throws an exception, the payload should not be trusted.
<?php
use Dana\Configuration;
use Dana\Webhook\WebhookParser;
// Initialize the WebhookParser
// You can provide the public key directly as a string or via a file path.
// The parser will prioritize publicKeyPath if both are provided.
// Option 1: Provide public key as a string
$danaPublicKey = getenv('DANA_PUBLIC_KEY');
$parser = new WebhookParser($danaPublicKey);
// Option 2: Provide path to public key file
// $danaPublicKeyPath = getenv('DANA_PUBLIC_KEY_PATH'); // e.g., "/path/to/your/dana_public_key.pem"
// $parser = new WebhookParser(null, $danaPublicKeyPath);
// Get the request data
$httpMethod = $_SERVER['REQUEST_METHOD'];
$relativePathUrl = '/v1.0/debit/notify'; // This should match the path DANA sends the webhook to
// Get headers - getallheaders() is the standard way in PHP
$headers = getallheaders();
// For frameworks that don't support getallheaders(), you can use:
// $headers = [];
// foreach ($_SERVER as $name => $value) {
// if (substr($name, 0, 5) === 'HTTP_') {
// $headers[str_replace(' ', '-', ucwords(strtolower(str_replace('_', ' ', substr($name, 5)))))] = $value;
// }
// }
// Get the raw request body as a JSON string
$webhookBodyStr = file_get_contents('php://input');
// If you need to access the decoded data before passing to the parser
// (Not required for parseWebhook which expects the raw string)
// $jsonData = json_decode($webhookBodyStr, true);
// if (json_last_error() !== JSON_ERROR_NONE) {
// throw new \RuntimeException('Invalid JSON in webhook payload: ' . json_last_error_msg());
// }
// echo "Request data: " . print_r($jsonData, true);
try {
// Parse and verify the webhook
$parsedData = $parser->parseWebhook(
$httpMethod,
$relativePathUrl,
$headers,
$webhookBodyStr
);
// If we reach here, the webhook was parsed and verified successfully
echo "Webhook verified successfully!\n";
echo "Original Partner Reference No: " . $parsedData->getOriginalPartnerReferenceNo() . "\n";
echo "Amount: " . $parsedData->getAmount()->getValue() . " " . $parsedData->getAmount()->getCurrency() . "\n";
echo "Status: " . $parsedData->getLatestTransactionStatus() . "\n";
// Access additional information if available
if ($parsedData->getAdditionalInfo() && $parsedData->getAdditionalInfo()->getPaymentInfo()) {
$paymentInfo = $parsedData->getAdditionalInfo()->getPaymentInfo();
$payOptions = $paymentInfo->getPayOptionInfos();
foreach ($payOptions as $payOption) {
echo "Payment Method: " . $payOption->getPayMethod() . "\n";
if ($payOption->getPayOption()) {
echo "Payment Option: " . $payOption->getPayOption() . "\n";
}
}
}
} catch (\Exception $e) {
// If verification fails, do not trust the payload
error_log("Webhook verification failed: " . $e->getMessage());
// Respond with an error
header('Content-Type: application/json');
http_response_code(400);
echo json_encode([
'response_code' => '96',
'response_message' => 'System Error'
]);
}
For detailed example, please refer to the following resource: Example Webhook.
Example of a successful payment webhook payload:
Content-type: application/json
X-TIMESTAMP: 2020-12-23T07:44:16+07:00
{
  "responseCode": "2005600",
  "responseMessage": "Successful"
}
Additional Enum Configuration
The library provides several enums (enumerations) to represent a fixed set of constant values, ensuring consistency and reducing errors during integration.
// Importing an enum class
use Dana\Widget\v1\Enum\TerminalType;
// Using enum constants
$model->setTerminalType(TerminalType::APP);
// Using enum values directly as strings
$model->setTerminalType('APP');
The following enums are available in the Library DANA Widget:
- ActorType
- OrderTerminalType
- PayMethod
- PayOption
- SourcePlatform
- TerminalType
- Type
- AcquirementStatus
- Mode
- ServiceScenario
- ServiceType
Optional Revoke DANA's user account
Use the Account Unbinding API to remove the connection between your platform and a user's DANA account. For specific users, contact DANA directly.
<?php
use Dana\Configuration;
use Dana\Env;
use Dana\Widget\v1\Api\WidgetApi;
use Dana\Widget\v1\Model\AccountUnbindingRequest;
// ... define authentication
$accountUnbindingRequest = AccountUnbindingRequest();
try {
$result = $apiInstance->accountUnbinding($accountUnbindingRequest);
print_r($result);
} catch (Exception $e) {
echo 'Exception when calling WidgetApi->accountUnbinding: ', $e->getMessage(), PHP_EOL;
}
Step 9 : Test using our automated test suite
Visit our Scenario Testing guide for detailed information on testing requirements.
We are required by local regulators to ensure your integration works correctly across all critical use cases. Use our sandbox environment and Merchant Portal to safely conduct UAT testing on a list of mandatory testing scenarios.
- Access your Integration Checklist page inside the Merchant Portal.
- Complete all mandatory testing scenarios listed in the checklist.
- After all required tests have been passed, sign the UAT Sign-Off Report in the Merchant Portal.
- Complete the Devsite Testing through the Merchant Portal to ensure compliance with Bank Indonesia SNAP standards.
UAT Testing Script
Use our specialized UAT testing suite to save days of debugging.
To speed up your integration, we have provided an automated test suite. It takes under 15 minutes to run your integration against our test scenarios. Check out the Github repo for more instructions
Step 10 : Submit testing documents & apply for production
As part of regulatory compliance, merchants are required to submit UAT testing documents to meet Bank Indonesia's requirements. After completing sandbox testing, follow these steps to move to production:
Generate production keys
Create your production private and public keys, follow this instruction: Authentication - Production Credential.Complete your UAT testing checklist
Confirm that you have completed all testing scenarios from our Merchant Portal.Fill out your Production Submission form
Follow the instructions inside our Merchant Portal to apply for production credentials. We will process your application in 1-2 days.Obtain production credentials
Once approved, you will receive your production credentials such as: Merchant ID, Client ID known as X-PARTNER-ID, and Client Secret.
Testing in the Production Environment
Configure the production environment
Update your application settings to switch from the sandbox environment to the production environment by using the correct production API endpoints and credentials.Test using production credentials
Download the Prod E2E Test Verification template in the Merchant Portal and start production testing as instructed. Upload the test results through the Merchant Portal.Receive live payments
After receiving all approvals, your DANA integration will be activated and ready for receive live payments from your customers.
Ready to submit testing documents?
Access our merchant portal for detailed guide to start receiving live payments
Step 1 : Library Installation
Visit our Libraries & Plugins guide for detailed information on our SDK.
DANA provides server-side API libraries for several programming languages, available through common package managers, for easier installation and version management. Follow the guide below to install our library:
Requirements
- JDK 1.8 or later.
- Your testing credentials from the merchant portal.
Installation
Install using maven or visit our GithubInstall the API Library using maven
- Add the following dependency to your
pom.xml
<dependency>
<groupId>id.dana</groupId>
<artifactId>dana-java</artifactId>
<version>2.1.9</version>
</dependency>
- run
mvn clean install
Set up the env
PRIVATE_KEY or PRIVATE_KEY_PATH # Private key string (PRIVATE_KEY) or path to private key file (PRIVATE_KEY_PATH)
ORIGIN # Your application's origin URL
X_PARTNER_ID # Client ID provided at onboarding
ENV or DANA_ENV # DANA's environment either 'sandbox' or 'production'
Obtaining merchant credentials: Authentication
Step 2 : Initialize the library
Visit our Authentication guide to learn about the authentication process when not using our Library.
Follow the guide below to initialize the library
import id.dana.invoker.Dana;
import id.dana.invoker.model.DanaConfig;
import id.dana.util.ConfigUtil;
public class Example {
public static void main(String[] args) {
DanaConfig.Builder danaConfigBuilder = new DanaConfig.Builder();
danaConfigBuilder
.partnerId(ConfigUtil.getConfig("X_PARTNER_ID", ""))
.privateKey(ConfigUtil.getConfig("PRIVATE_KEY", ""))
.origin(ConfigUtil.getConfig("ORIGIN", ""));
DanaConfig.getInstance(danaConfigBuilder);
Dana danaClient = Dana.getInstance();
}
}
Step 3 : Bind to DANA Account
To bind a DANA Account, you first generate the binding deeplink/redirect URL, open it to hand off the user to the DANA App to complete authorization, then return the user to your App via your redirectUrl. The flow is as follows:
Call the Deeplink Binding to generate the redirect URL for DANA account binding. If you already have the user’s phone number and want to use Seamless Binding, include seamlessData in the request so the user can skip manual input. If you don’t provide seamlessData, DANA will use Normal Binding and ask the user to enter their phone number.
Open the Deeplink/redirect URL using the OS/native browser so universal links and deeplinks can correctly hand off to the DANA App.
If you must use an in-app WebView, intercept DANA deeplinks/universal links and open them externally (don’t let the WebView load them as normal pages). Allowlist:
danaid://https://link.dana.idhttps://m.dana.idhttps://danaid.link
Implementation tips:
- Android WebView: implement both
shouldOverrideUrlLoadingvariants, open withIntent(Intent.ACTION_VIEW, uri), then returntrue. - React Native WebView: use
onShouldStartLoadWithRequest, callLinking.openURL(req.url)for allowlisted URLs /intent://, then returnfalse. - Flutter WebView: listen to URL changes, stop navigation for allowlisted URLs, then launch via OS.
- Web redirects: prefer a user click on an
<a href="...">link; if issues occur withwindow.open/window.location.href, switch to a click based redirect.
If you still encounter WebView or web redirect issues, refer to: Deeplink Binding and Payment
After authorization, DANA redirects the user to the merchant’s redirectUrl with an authCode. This authCode is valid for 10 minutes, exchange it immediately for an access token via the Apply Token API.
https://www.merchant.com/oauth/callback?responseCode=2001000&responseMessage=Successful&authCode=xxx&state=2345555
Step 4 : Exchange the authCode into accessToken
After obtaining the authCode, exchange it for an accessToken using the Apply Token API. The returned accessToken and refreshToken both have a 3-year validity period. Once expired, users must rebind their DANA account.
import id.dana.invoker.Dana;
import id.dana.widget.v1.api.WidgetApi;
import id.dana.widget.v1.model.ApplyTokenRequest;
import id.dana.widget.v1.model.ApplyTokenResponse;
public class Example {
public static void main(String[] args) {
WidgetApi api = Dana.getInstance().getWidgetApi();
ApplyTokenRequest applyTokenRequest = new ApplyTokenRequest();
try {
ApplyTokenResponse response = api.applyToken(applyTokenRequest);
System.out.println(response);
} catch (DanaException e) {
e.printStackTrace();
}
}
}
Step 5 : Use the Direct Debit Payment API to get a hosted checkout URL
Use the Direct Debit Payment API to create new payment requests which will then return the Checkout URL of the hosted payment page.
To create a new order, make a POST request to the Direct Debit Payment API:
import id.dana.invoker.Dana;
import id.dana.widget.v1.api.WidgetApi;
import id.dana.widget.v1.model.WidgetPaymentRequest;
import id.dana.widget.v1.model.WidgetPaymentResponse;
public class Example {
public static void main(String[] args) {
WidgetApi api = Dana.getInstance().getWidgetApi();
WidgetPaymentRequest widgetPaymentRequest = new WidgetPaymentRequest();
try {
WidgetPaymentResponse response = api.widgetPayment(widgetPaymentRequest);
System.out.println(response);
} catch (DanaException e) {
e.printStackTrace();
}
}
}
If successful, the response will include the URL for the DANA's payment page. For example:
```JSON title="Sample response from Direct Debit Payment API"
Content-Type: application/json
X-TIMESTAMP: 2020-12-23T08:31:11+07:00
{
  "responseCode": "2005400", // Refer to response code list
  "responseMessage": "Successful", // Refer to response code list
  "referenceNo": "2020102977770000000009", // Transaction identifier on DANA system
  "partnerReferenceNo": "2020102900000000000001", // Transaction identifier on partner system
  "webRedirectUrl": "https://pjsp.com/universal?bizNo=REF993883&...",
  "additionalInfo":{}
}
Step 6 : Access DANA's page by hitting Apply OTT API
To access DANA's payment page, convert the user's access token to a one-time token (OTT) via the Apply OTT API. This token has a 10-minute expiration period and can be used only once.
import id.dana.invoker.Dana;
import id.dana.widget.v1.api.WidgetApi;
import id.dana.widget.v1.model.ApplyOTTRequest;
import id.dana.widget.v1.model.ApplyOTTResponse;
public class Example {
public static void main(String[] args) {
WidgetApi api = Dana.getInstance().getWidgetApi();
ApplyOTTRequest applyOTTRequest = new ApplyOTTRequest();
try {
ApplyOTTResponse response = api.applyOTT(applyOTTRequest);
System.out.println(response);
} catch (DanaException e) {
e.printStackTrace();
}
}
}
Step 7 : Redirect to DANA’s checkout page
Generate a payment URL by combining the webRedirectUrl from the Direct Debit Payment API with an OTT token from the Apply OTT API.
Optional Query Order Status, Cancel Order, Refund Order, Balance Inquiry, and Query User Profile
There are additional APIs available to enhance your integration process:
- Query Payment API - Use this API to inquire the latest status of a payment request.
- Cancel Order API - For unpaid orders or those paid within 24 hours, a full refund returns to the customer's original payment source.
- Refund Order API - Process refunds for completed orders. You can trigger a refund request on behalf of the customer using this API, who will then process the refund through DANA.
- Balance Inquiry API - Implement this API to verify the customer's balance before order creation. Disabling payment methods with insufficient funds will increase your order success rate.
- Query User Profile API - In order to obtain the user's profile information including DANA balance (unit in IDR), masked DANA phone number, KYC status or One Time Token (OTT).
import id.dana.invoker.Dana;
import id.dana.widget.v1.api.WidgetApi;
import id.dana.widget.v1.model.QueryPaymentRequest;
import id.dana.widget.v1.model.QueryPaymentResponse;
public class Example {
public static void main(String[] args) {
WidgetApi api = Dana.getInstance().getWidgetApi();
QueryPaymentRequest queryPaymentRequest = new QueryPaymentRequest();
try {
QueryPaymentResponse response = api.queryPayment(queryPaymentRequest);
System.out.println(response);
} catch (DanaException e) {
e.printStackTrace();
}
}
}
import id.dana.invoker.Dana;
import id.dana.widget.v1.api.WidgetApi;
import id.dana.widget.v1.model.CancelOrderRequest;
import id.dana.widget.v1.model.CancelOrderResponse;
public class Example {
public static void main(String[] args) {
WidgetApi api = Dana.getInstance().getWidgetApi();
CancelOrderRequest cancelOrderRequest = new CancelOrderRequest();
try {
CancelOrderResponse response = api.cancelOrder(cancelOrderRequest);
System.out.println(response);
} catch (DanaException e) {
e.printStackTrace();
}
}
}
import id.dana.invoker.Dana;
import id.dana.widget.v1.api.WidgetApi;
import id.dana.widget.v1.model.RefundOrderRequest;
import id.dana.widget.v1.model.RefundOrderResponse;
public class Example {
public static void main(String[] args) {
WidgetApi api = Dana.getInstance().getWidgetApi();
RefundOrderRequest refundOrderRequest = new RefundOrderRequest();
try {
RefundOrderResponse response = api.refundOrder(refundOrderRequest);
System.out.println(response);
} catch (DanaException e) {
e.printStackTrace();
}
}
}
import id.dana.invoker.Dana;
import id.dana.widget.v1.api.WidgetApi;
import id.dana.widget.v1.model.BalanceInquiryRequest;
import id.dana.widget.v1.model.BalanceInquiryResponse;
public class Example {
public static void main(String[] args) {
WidgetApi api = Dana.getInstance().getWidgetApi();
BalanceInquiryRequest balanceInquiryRequest = new BalanceInquiryRequest();
try {
BalanceInquiryResponse response = api.balanceInquiry(balanceInquiryRequest);
System.out.println(response);
} catch (DanaException e) {
e.printStackTrace();
}
}
}
import id.dana.invoker.Dana;
import id.dana.widget.v1.api.WidgetApi;
import id.dana.widget.v1.model.QueryUserProfileRequest;
import id.dana.widget.v1.model.QueryUserProfileResponse;
public class Example {
public static void main(String[] args) {
WidgetApi api = Dana.getInstance().getWidgetApi();
QueryUserProfileRequest queryUserProfileRequest = new QueryUserProfileRequest();
try {
QueryUserProfileResponse response = api.queryUserProfile(queryUserProfileRequest);
System.out.println(response);
} catch (DanaException e) {
e.printStackTrace();
}
}
}
Step 8 : Receive Payment Outcome
After a successful payment:
-
Notification: The user will be redirected to your specified Redirect URL, which you can configure using the
urlParamsparameter in the Direct Debit Payment API request, the redirection URL has a format like:https:xxx?originalReferenceNo=xxx&originalPartnerReferenceNo=xxx&merchantId=xxxx&status=xxx- merchant redirect URL: set on
urlParams.url - originalReferenceNo: Original transaction identifier on DANA system
- originalPartnerReferenceNo: Original transaction identifier on partner system
- merchantId: Merchant identifier that is unique per each merchant
- status: Payment transaction in DANA side
- Example:
https://www.merchantUrl.com/result/?originalReferenceNo=20250613111212800100166070954004283&originalPartnerReferenceNo=8562466e47144b5f82c003b47ae3c474&merchantId=216620000020928274717&status=SUCCESS
- merchant redirect URL: set on
-
[Optional] Finish Notify: In case you add
urlParams.type = NOTIFICATION, DANA will send payment notifications to your Notification URL via the Finish Notify API. Configure your notification endpoint with the ASPI-mandated path format:/v1.0/debit/notify.
Example of a successful payment webhook payload:
Content-type: application/json
X-TIMESTAMP: 2020-12-23T07:44:16+07:00
{
  "responseCode": "2005600",
  "responseMessage": "Successful"
}
Optional Revoke DANA's user account
Use the Account Unbinding API to remove the connection between your platform and a user's DANA account. For specific users, contact DANA directly.
import id.dana.invoker.Dana;
import id.dana.widget.v1.api.WidgetApi;
import id.dana.widget.v1.model.QueryUserProfileRequest;
import id.dana.widget.v1.model.QueryUserProfileResponse;

public class Example {
    public static void main(String[] args) {
        WidgetApi api = Dana.getInstance().getWidgetApi();

        QueryUserProfileRequest queryUserProfileRequest = new QueryUserProfileRequest();

        try {
            QueryUserProfileResponse response = api.queryUserProfile(queryUserProfileRequest);
            System.out.println(response);
        } catch (DanaException e) {
            e.printStackTrace();
        }
    }
}
Step 9 : Test using our automated test suite
Visit our Scenario Testing guide for detailed information on testing requirements.
We are required by local regulators to ensure your integration works correctly across all critical use cases. Use our sandbox environment and Merchant Portal to safely conduct UAT testing on a list of mandatory testing scenarios.
- Access your Integration Checklist page inside the Merchant Portal.
- Complete all mandatory testing scenarios listed in the checklist.
- After all required tests have been passed, sign the UAT Sign-Off Report in the Merchant Portal.
- Complete the Devsite Testing through the Merchant Portal to ensure compliance with Bank Indonesia SNAP standards.
UAT Testing Script
Use our specialized UAT testing suite to save days of debugging.
To speed up your integration, we have provided an automated test suite. It takes under 15 minutes to run your integration against our test scenarios. Check out the Github repo for more instructions
Step 10 : Submit testing documents & apply for production
As part of regulatory compliance, merchants are required to submit UAT testing documents to meet Bank Indonesia's requirements. After completing sandbox testing, follow these steps to move to production:
Generate production keys
Create your production private and public keys, follow this instruction: Authentication - Production Credential.Complete your UAT testing checklist
Confirm that you have completed all testing scenarios from our Merchant Portal.Fill out your Production Submission form
Follow the instructions inside our Merchant Portal to apply for production credentials. We will process your application in 1-2 days.Obtain production credentials
Once approved, you will receive your production credentials such as: Merchant ID, Client ID known as X-PARTNER-ID, and Client Secret.
Testing in the Production Environment
Configure the production environment
Update your application settings to switch from the sandbox environment to the production environment by using the correct production API endpoints and credentials.Test using production credentials
Download the Prod E2E Test Verification template in the Merchant Portal and start production testing as instructed. Upload the test results through the Merchant Portal.Receive live payments
After receiving all approvals, your DANA integration will be activated and ready for receive live payments from your customers.
Ready to submit testing documents?
Access our merchant portal for detailed guide to start receiving live payments