Division
Division (also referred to as Sub-Merchant) is a logical group under a merchant that organizes multiple shops. It enables merchants to manage business units, track performance, and process payments or settlements at the division level.
Merchant management is also available for shop. Check our Merchant Management Overview for more details
Before you start
You will need to register your business in our Merchant Portal to obtain your testing credentials. After you have created your test account, make sure you have done the following:
- Finish your company registration and select Division as your solution.
- Obtain your testing credentials from the merchant portal.
Process Flow
The general flow of Division is as follows:
Visit the Division API Overview for other scenarios.
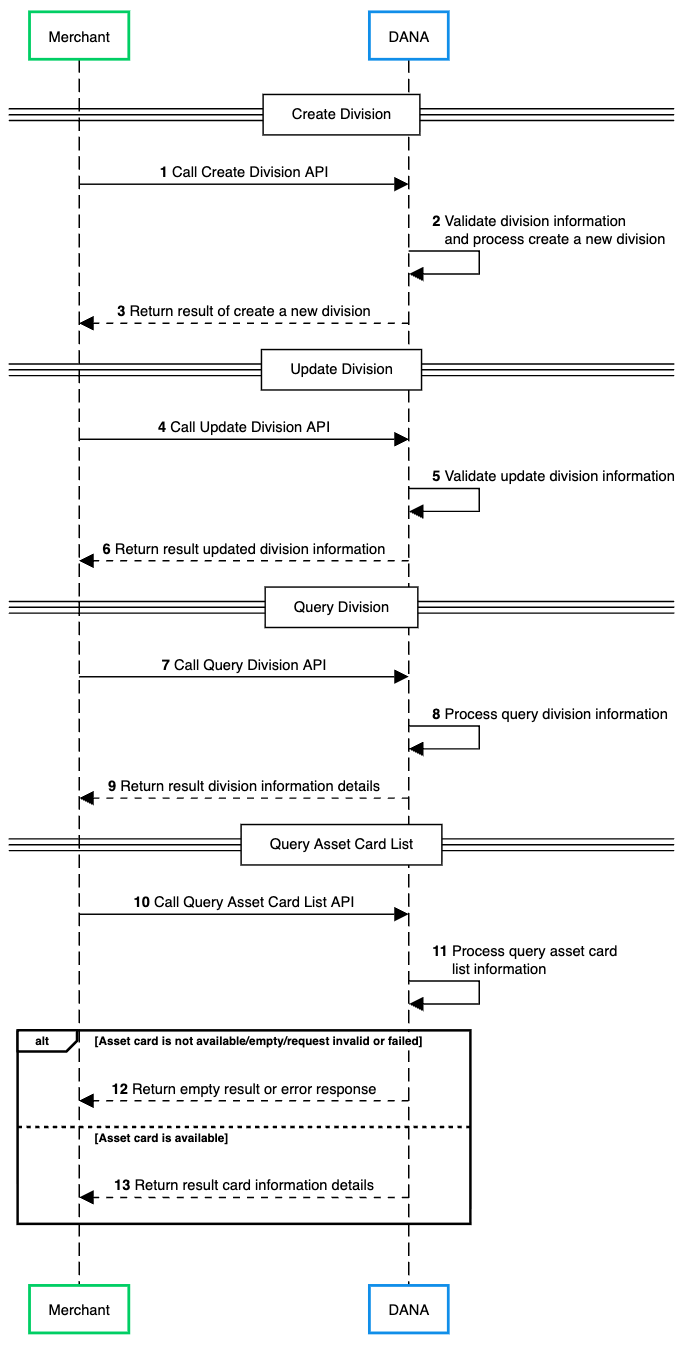
- Merchant initiates the process by calling the Create Division API to DANA to create a new division.
- DANA receives the request and begins validating the division information provided by the merchant. After validation, DANA processes the request to create a new division in the system.
- DANA returns the result of the division creation process back to the merchant, indicating success or failure.
- Merchant initiates the process by calling the Update Division API to DANA to update division information.
- DANA receives the request and validates the update division information provided by the merchant.
- DANA returns the result of the division update process back to the merchant, confirming the updated division information.
- Merchant initiates the process by calling the Query Division API to DANA to got division information.
- DANA receives the request and processes the query to retrieve division information.
- DANA returns the result containing division information details back to the merchant.
- Merchant initiates the process by calling the Query Asset Card List API to DANA to retrieve user’s card list information.
- DANA receives the request and processes the query to retrieve user’s card list information.
- If the asset card is not available/empty/request invalid, DANA returns the result containing empty result or error response.
- If the asset card is available, DANA returns the result containing user’s card information details back to the merchant.
- NodeJS
- Python
- Go
- PHP
- Java
Step 1 : Library Installation
Visit our Libraries & Plugins guide for detailed information on our SDK.
DANA provides server-side API libraries for several programming languages, available through common package managers, for easier installation and version management. Follow the guide below to install our library:
Requirements
- Node.js version 18 or later
- Your testing credentials from the merchant portal.
Installation
Install using npm or visit our Githubnpm install dana-node@latest --save
Set up the env
PRIVATE_KEY or PRIVATE_KEY_PATH         # Your private key
ORIGIN                                  # Your application's origin URL
X_PARTNER_ID                            # clientId provided during onboarding
ENV or DANA_ENV                         # DANA's environment either 'sandbox' or 'production'
DANA_PUBLIC_KEY or DANA_PUBLIC_KEY_PATH # DANA public key string for parsing webhook
CLIENT_SECRET                           # Assigned client secret during registration
Obtaining merchant credentials: Authentication
Step 2 : Initialize the library
Visit our Authentication guide to learn about the authentication process when not using our Library.
Follow the guide below to initialize the library
import { Dana } from 'dana-node';

const danaClient = new Dana({
    partnerId: "YOUR_PARTNER_ID", // process.env.X_PARTNER_ID
    privateKey: "YOUR_PRIVATE_KEY", // process.env.X_PRIVATE_KEY
    origin: "YOUR_ORIGIN", // process.env.ORIGIN
    env: "sandbox", // process.env.DANA_ENV or process.env.ENV or "sandbox" or "production"
    clientSecret: "YOUR_CLIENT_SECRET", // process.env.X_CLIENT_SECRET
});
const { merchantManagementApi } = danaClient;
Step 3 : Save your a new Division information
Use Create Division API to create a new division. Each division has a unique identifier (divisionId).
To create a new division, make a POST request to the Create Division API.
import { Dana } from 'dana-node';
import { CreateDivisionRequest, CreateDivisionResponse } from 'dana-node/merchant_management/v1';

// .. initialize client with authentication

const request: CreateDivisionRequest = {
// Define the request parameters for the API call here
};

const response: CreateDivisionResponse = await merchantManagementApi.createDivision(request);
Step 4 : Maintain your division information by hitting Update Division API
Use this API to modify or update information of an existing division (e.g. name, contact details, address, settings).
To update a division, make a POST request to Update Division API.
import { Dana } from 'dana-node';
import { UpdateDivisionRequest, UpdateDivisionResponse } from 'dana-node/merchant_management/v1';

// .. initialize client with authentication

const request: UpdateDivisionRequest = {
// Define the request parameters for the API call here
};

const response: UpdateDivisionResponse = await merchantManagementApi.updateDivision(request);
Step 5 : Inquire your division information
Use Query Division API to retrieve the latest division information, such as getting division details by ID or getting a list of all divisions under a merchant.
import { Dana } from 'dana-node';
import { QueryDivisionRequest, QueryDivisionResponse } from 'dana-node/merchant_management/v1';

// .. initialize client with authentication

const request: QueryDivisionRequest = {
// Define the request parameters for the API call here
};

const response: QueryDivisionResponse = await merchantManagementApi.queryDivision(request);
Step 6 : Inquire user’s available asset card list
Use the Query Asset Card List API to inquire information of user’s available asset card list.
import { Dana } from 'dana-node';
import { QueryAssetCardListRequest, QueryAssetCardListResponse } from 'dana-node/merchant_management/v1';

// .. initialize client with authentication

const request: QueryAssetCardListRequest = {
// Fill in required fields here, refer to Query Asset Card List API Detail
};

const response: QueryAssetCardListResponse = await merchantManagementApi.queryAssetCardList(request);
Additional Enum Configuration
The library provides several enums (enumerations) to represent a fixed set of constant values, ensuring consistency and reducing errors during integration.
In Node.js, enums are located within each model class rather than being centralized in a separate enum file. Each enum is named after its parent model.
import { DivisionResourceInfoParentRoleTypeEnum } from 'dana-node/merchant_management/v1';

// Use the enum value
const parentRoleType = DivisionResourceInfoParentRoleTypeEnum.Merchant;
In this example the DivisionResourceInfo is the parent model and ParentRoleType is the enum name. In below list, the enums are listed in format of (ParentModel) (EnumName) (Enum Field).
The following enums are available in the Library Division:
- AssetCardListItemContactBizTypeEnum (contactBizType)
- AssetCardListItemAssetTypeEnum (assetType)
- AssetCardListItemVerifiedEnum (verified)
- AssetCardListItemDefaultAssetEnum (defaultAsset)
- AssetCardListItemEnableStatusEnum (enableStatus)
- AssetCardListItemDirectDebitEnum (directDebit)
- BusinessDocsDocTypeEnum (docType)
- CreateDivisionRequestParentRoleTypeEnum (parentRoleType)
- CreateDivisionRequestDivisionTypeEnum (divisionType)
- CreateDivisionRequestBusinessEntityEnum (businessEntity)
- CreateDivisionRequestOwnerIdTypeEnum (ownerIdType)
- CreateDivisionRequestSizeTypeEnum (sizeType)
- CreateDivisionRequestPgDivisionFlagEnum (pgDivisionFlag)
- CreateDivisionRequestExtInfoGOODSSOLDTYPEEnum (gOODSSOLDTYPE)
- CreateDivisionRequestExtInfoUSERPROFILINGEnum (uSERPROFILING)
- CreateDivisionResponseResponseHeadFunctionEnum (function)
- DivisionResourceInfoParentRoleTypeEnum (parentRoleType)
- DivisionResourceInfoDivisionTypeEnum (divisionType)
- DivisionResourceInfoPgDivisionFlagEnum (pgDivisionFlag)
- MemberAssetResultInfoResultStatusEnum (resultStatus)
- MerchantResourceInformationResourceTypeEnum (resourceType)
- MobileNoInfoVerifiedEnum (verified)
- QueryAssetCardListRequestEnableOnlyEnum (enableOnly)
- QueryAssetCardListRequestContactBizTypeListEnum (contactBizTypeList)
- QueryAssetCardListRequestAssetTypeListEnum (assetTypeList)
- QueryAssetCardListResponseResponseHeadFunctionEnum (function)
- QueryDivisionRequestDivisionIdTypeEnum (divisionIdType)
- QueryDivisionResponseResponseHeadFunctionEnum (function)
- QueryMerchantResourceRequestMerchantResourceInfoListEnum (merchantResourceInfoList)
- QueryMerchantResourceResponseResponseHeadFunctionEnum (function)
- ResultInfoResultStatusEnum (resultStatus)
- UpdateDivisionRequestDivisionTypeEnum (divisionType)
- UpdateDivisionRequestDivisionIdTypeEnum (divisionIdType)
- UpdateDivisionRequestBusinessEntityEnum (businessEntity)
- UpdateDivisionRequestOwnerIdTypeEnum (ownerIdType)
- UpdateDivisionRequestSizeTypeEnum (sizeType)
- UpdateDivisionRequestPgDivisionFlagEnum (pgDivisionFlag)
- UpdateDivisionResponseResponseHeadFunctionEnum (function)
Step 7 : Test using our automated test suite
Visit our Scenario Testing guide for detailed information on testing requirements.
We are required by local regulators to ensure your integration works correctly across all critical use cases. Use our sandbox environment and Merchant Portal to safely conduct UAT testing on a list of mandatory testing scenarios.
To complete our mandatory testing requirements, follow these steps:
- Access your Integration Checklist page inside the Merchant Portal.
- Complete all mandatory testing scenarios listed in the checklist.
- After all required tests have been passed, sign the UAT Sign-Off Report in the Merchant Portal.
- Complete the Devsite Testing through the Merchant Portal to ensure compliance with Bank Indonesia SNAP standards.
UAT Testing Script
Use our specialized UAT testing suite to save days of debugging.
To speed up your integration, we have provided an automated test suite. It takes under 15 minutes to run your integration against our test scenarios. Check out the Github repo for more instructions
Step 8 : Submit testing documents & apply for production
As part of regulatory compliance, merchants are required to submit UAT testing documents to meet Bank Indonesia's requirements. After completing sandbox testing, follow these steps to move to production:
Generate production keys
Create your production private and public keys, follow this instruction: Authentication - Production Credential.Complete your UAT testing checklist
Confirm that you have completed all testing scenarios from our Merchant Portal.Fill out your Production Submission form
Follow the instructions inside our Merchant Portal to apply for production credentials. We will process your application in 1-2 days.Obtain production credentials
Once approved, you will receive your production credentials such as: Merchant ID, Client ID known as X-PARTNER-ID, and Client Secret.
Testing in the Production Environment
Configure the production environment
Update your application settings to switch from the sandbox environment to the production environment by using the correct production API endpoints and credentials.Test using production credentials
Download the Prod E2E Test Verification template in the Merchant Portal and start production testing as instructed. Upload the test results through the Merchant Portal.Receive live payments
After receiving all approvals, your DANA integration will be activated and ready for receive live payments from your customers.
Ready to submit testing documents?
Access our merchant portal for detailed guide to start receiving live payments
Step 1 : Library Installation
Visit our Libraries & Plugins guide for detailed information on our SDK.
DANA provides server-side API libraries for several programming languages, available through common package managers, for easier installation and version management. Follow the guide below to install our library:
- Python 3.9.1+
- Your testing credentials from the merchant portal.
Installation
Install using pip or visit our Githubpip install dana-python
Set up the env
PRIVATE_KEY or PRIVATE_KEY_PATH         # Your private key
ORIGIN                                  # Your application's origin URL
X_PARTNER_ID                            # clientId provided during onboarding
ENV or DANA_ENV                         # DANA's environment either 'sandbox' or 'production'
DANA_PUBLIC_KEY or DANA_PUBLIC_KEY_PATH # DANA public key string for parsing webhook
CLIENT_SECRET                           # Assigned client secret during registration
Obtaining merchant credentials: Authentication
Import Package
import dana.merchant_management.v1
Step 2 : Initialize the library
Visit our Authentication guide to learn about the authentication process when not using our Library.
Follow the guide below to initialize the library
import os
from dana.utils.snap_configuration import SnapConfiguration, AuthSettings, Env

configuration = OpenApiConfiguration(
api_key=OpenApiAuthSettings(
  CLIENT_SECRET=os.environ.get("CLIENT_SECRET"),
  CLIENT_ID=os.environ.get("CLIENT_ID"),
  DANA_ENV=os.environ.get("DANA_ENV"),
  ENV=os.environ.get("ENV")
    )
)
Step 3 : Save your a new division information
Use Create Division API to create a new division. Each division has a unique identifier (divisionId).
To create a new division, make a POST request to the Create Division API.
package main

import os
from dana.utils.snap_configuration import SnapConfiguration, AuthSettings, Env
from dana.merchant_management.v1 import MerchantManagementApi
from dana.merchant_management.v1.models.CreateShopRequest import CreateShopRequest
from dana.api_client import ApiClient
from dana.rest import ApiException
from pprint import pprint

# Configure API key authorization: CLIENT_SECRET
# For OPEN_API type, we use CLIENT_SECRET authentication
configuration = OpenApiConfiguration(
  // .. initialize client with authentication
)

with ApiClient(configuration) as api_client:
  api_instance = MerchantManagementApi(api_client)
  create_division_request = CreateDivisionRequest()

try:
  api_response = api_instance.create_division(create_division_request)
  print("The response of MerchantManagementApi->create_division:\n")
  pprint(api_response)
except Exception as e:
  print("Exception when calling MerchantManagementApi->create_division: %s\n" % e)
Step 4 : Maintain your division information by hitting Update Division API
Use this API to update information about an existing division. You can modify existing division (e.g. name, contact details, address, settings).
To update a division, make a POST request to Update Division API.
package main

import os
from dana.utils.snap_configuration import SnapConfiguration, AuthSettings, Env
from dana.merchant_management.v1 import MerchantManagementApi
from dana.merchant_management.v1.models.UpdateShopRequest import UpdateShopRequest
from dana.api_client import ApiClient
from dana.rest import ApiException
from pprint import pprint

# Configure API key authorization: CLIENT_SECRET
# For OPEN_API type, we use CLIENT_SECRET authentication
configuration = OpenApiConfiguration(
// .. initialize client with authentication
)

with ApiClient(configuration) as api_client:
api_instance = MerchantManagementApi(api_client)
update_division_request = UpdateDivisionRequest()

try:
  api_response = api_instance.update_division(update_division_request)
  print("The response of MerchantManagementApi->update_division:\n")
  pprint(api_response)
except Exception as e:
  print("Exception when calling MerchantManagementApi->update_division: %s\n" % e)
Step 5 : Inquire your division information
Use Query Division API to retrieve the latest division information, such as getting division details by ID or getting a list of all divisions under a merchant.
package main

import os
from dana.utils.snap_configuration import SnapConfiguration, AuthSettings, Env
from dana.merchant_management.v1 import MerchantManagementApi
from dana.merchant_management.v1.models.UpdateShopRequest import UpdateShopRequest
from dana.api_client import ApiClient
from dana.rest import ApiException
from pprint import pprint

# Configure API key authorization: CLIENT_SECRET
# For OPEN_API type, we use CLIENT_SECRET authentication
configuration = OpenApiConfiguration(
// .. initialize client with authentication
)

with ApiClient(configuration) as api_client:
api_instance = MerchantManagementApi(api_client)
query_division_request = QueryDivisionRequest()

try:
  api_response = api_instance.query_division(query_division_request)
  print("The response of MerchantManagementApi->query_division:\n")
  pprint(api_response)
except Exception as e:
  print("Exception when calling MerchantManagementApi->query_shop: %s\n" % e)
Step 6 : Inquire user’s available asset card list
Use the Query Asset Card List API to inquire information of user’s available asset card list.
  import os
  from dana.utils.snap_configuration import SnapConfiguration, AuthSettings, Env
  from dana.merchant_management.v1 import MerchantManagementApi
  from dana.merchant_management.v1.models.QueryAssetCardListRequest import QueryAssetCardListRequest
  from dana.api_client import ApiClient
  from dana.rest import ApiException
  from pprint import pprint

  # configuration and ApiClient object can be used for multiple operations
  # They should be singleton through the application lifecycle
  configuration = SnapConfiguration(
      // .. initialize client with authentication
  )

  # Configure API key authorization: CLIENT_SECRET
  # For OPEN_API type, we use CLIENT_SECRET authentication
  configuration = OpenApiConfiguration(
      // .. initialize client with authentication
  )

  with ApiClient(configuration) as api_client:
      api_instance = MerchantManagementApi(api_client)
      query_asset_card_list_request = QueryAssetCardListRequest()

      try:
          api_response = api_instance.query_asset_card_list(query_asset_card_list_request)
          print("The response of MerchantManagementApi->query_asset_card_list:\n")
          pprint(api_response)
      except Exception as e:
          print("Exception when calling MerchantManagementApi->query_asset_card_list: %s\n" % e)
Additional Enum Configuration
The library provides several enums (enumerations) to represent a fixed set of constant values, ensuring consistency and reducing errors during integration.
from dana.merchant_management.v1.enum import *

# Example of using enum
enum_value = DivisionType.MERCHANT
The following enums are available in the Library Shop:
- SizeType
- Loyalty
- BusinessEntity
- OwnerIdType
- ParentRoleType
- DivisionType
- GOODS_SOLD_TYPE
- USER_PROFILING
- PgDivisionFlag
- DivisionIdType
- ResourceType
- Verified
- DocType
- ResultStatus
- ContactBizType
- AssetType
- DefaultAsset
- EnableStatus
- DirectDebit
- EnableOnly
Step 7 : Test using our automated test suite
Visit our Scenario Testing guide for detailed information on testing requirements.
We are required by local regulators to ensure your integration works correctly across all critical use cases. Use our sandbox environment and Merchant Portal to safely conduct UAT testing on a list of mandatory testing scenarios.
To complete our mandatory testing requirements, follow these steps:
- Access your Integration Checklist page inside the Merchant Portal.
- Complete all mandatory testing scenarios listed in the checklist.
- After all required tests have been passed, sign the UAT Sign-Off Report in the Merchant Portal.
- Complete the Devsite Testing through the Merchant Portal to ensure compliance with Bank Indonesia SNAP standards.
UAT Testing Script
Use our specialized UAT testing suite to save days of debugging.
To speed up your integration, we have provided an automated test suite. It takes under 15 minutes to run your integration against our test scenarios. Check out the Github repo for more instructions
Step 8 : Submit testing documents & apply for production
As part of regulatory compliance, merchants are required to submit UAT testing documents to meet Bank Indonesia's requirements. After completing sandbox testing, follow these steps to move to production:
Generate production keys
Create your production private and public keys, follow this instruction: Authentication - Production Credential.Complete your UAT testing checklist
Confirm that you have completed all testing scenarios from our Merchant Portal.Fill out your Production Submission form
Follow the instructions inside our Merchant Portal to apply for production credentials. We will process your application in 1-2 days.Obtain production credentials
Once approved, you will receive your production credentials such as: Merchant ID, Client ID known as X-PARTNER-ID, and Client Secret.
Testing in the Production Environment
Configure the production environment
Update your application settings to switch from the sandbox environment to the production environment by using the correct production API endpoints and credentials.Test using production credentials
Download the Prod E2E Test Verification template in the Merchant Portal and start production testing as instructed. Upload the test results through the Merchant Portal.Receive live payments
After receiving all approvals, your DANA integration will be activated and ready for receive live payments from your customers.
Ready to submit testing documents?
Access our merchant portal for detailed guide to start receiving live payments
Step 1 : Library Installation
Visit our Libraries & Plugins guide for detailed information on our SDK.
DANA provides server-side API libraries for several programming languages, available through common package managers, for easier installation and version management. Follow the guide below to install our library:
Requirements
- go.mod
- go.sum file
- Your testing credentials from the merchant portal.
Installation
Install or visit our Githubgo get github.com/dana-id/dana-go/v2
Set up the env
PRIVATE_KEY or PRIVATE_KEY_PATH        # Your private key
ORIGIN                                 # Your application's origin URL
X_PARTNER_ID                           # clientId provided during onboarding
ENV                                    # DANA's environment either 'sandbox' or 'production'
Obtaining merchant credentials: Authentication
Import Package
import (
  merchant_management "github.com/dana-id/dana-go/merchant_management/v1"
)
Step 2 : Initialize the library
Visit our Authentication guide to learn about the authentication process when not using our Library.
Follow the guide below to initialize the library
package main

import (
"context"
"fmt"
"os"
dana "github.com/dana-id/dana-go"
"github.com/dana-id/dana-go/config"
merchant_management "github.com/dana-id/dana-go/merchant_management/v1"
)

func main() {

configuration := config.NewConfiguration()
// Set API keys
configuration.APIKey = &config.APIKey{
  // ENV:          config.ENV_SANDBOX, // use config.ENV_PRODUCTION for production. Can use DANA_ENV instead
  DANA_ENV:     config.ENV_SANDBOX, // use config.ENV_PRODUCTION for production
  X_PARTNER_ID: os.Getenv("X_PARTNER_ID"),
  PRIVATE_KEY:  os.Getenv("PRIVATE_KEY"),
  ORIGIN:       os.Getenv("ORIGIN"),
  // PRIVATE_KEY_PATH: os.Getenv("PRIVATE_KEY_PATH"),
}
apiClient := dana.NewAPIClient(configuration)
Step 3 : Save your a new division information
Use Create Division API to create a new division. Each division has a unique identifier (divisionId).
To create a new division, make a POST request to the Create Division API.
package main

import (
"context"
"fmt"
"os"
dana "github.com/dana-id/dana-go"
"github.com/dana-id/dana-go/config"
merchant_management "github.com/dana-id/dana-go/merchant_management/v1"
)

func main() {

_, r, err := apiClient.MerchantManagementAPI.CreateDivision(context.Background()).CreateDivisionRequest(request).Execute()
if err != nil {
  fmt.Fprintf(os.Stderr, "Error when calling `MerchantManagementAPI.CreateDivision``: %v\n", err)
  fmt.Fprintf(os.Stderr, "Full HTTP response: %v\n", r)
}
// response from `CreateDivision`: CreateDivisionResponse
fmt.Fprintf(os.Stdout, "Response from `MerchantManagementAPI.CreateDivision`: %v\n", r.Body)
}
Step 4 : Maintain your division information by hitting Update Division API
Use this API to update information about an existing division. You can modify existing division information such as name, address, phone number, etc.
To update a division, make a POST request to Update Division API.
package main

import (
"context"
"fmt"
"os"
dana "github.com/dana-id/dana-go"
"github.com/dana-id/dana-go/config"
merchant_management "github.com/dana-id/dana-go/merchant_management/v1"
)

func main() {
// ... define authentication
request := merchant_management.UpdateDivisionRequest{
  // Fill in required fields here, refer to Update Division API Detail
}

_, r, err := apiClient.MerchantManagementAPI.UpdateDivision(context.Background()).UpdateDivisionRequest(request).Execute()
if err != nil {
  fmt.Fprintf(os.Stderr, "Error when calling `MerchantManagementAPI.UpdateDivision``: %v\n", err)
  fmt.Fprintf(os.Stderr, "Full HTTP response: %v\n", r)
}
// response from `UpdateDivision`: UpdateDivisionResponse
fmt.Fprintf(os.Stdout, "Response from `MerchantManagementAPI.UpdateDivision`: %v\n", r.Body)
}
Step 5 : Inquire your division information
Use Query Division API to retrieve the latest division information, such as getting division details by ID or getting a list of all divisions under a merchant.
package main

import (
"context"
"fmt"
"os"
dana "github.com/dana-id/dana-go"
"github.com/dana-id/dana-go/config"
merchant_management "github.com/dana-id/dana-go/merchant_management/v1"
)

func main() {
// ... define authentication
request := merchant_management.QueryDivisionRequest{
  // Fill in required fields here, refer to Query Division API Detail
}

_, r, err := apiClient.MerchantManagementAPI.QueryDivision(context.Background()).QueryDivisionRequest(request).Execute()
if err != nil {
  fmt.Fprintf(os.Stderr, "Error when calling `MerchantManagementAPI.QueryDivision``: %v\n", err)
  fmt.Fprintf(os.Stderr, "Full HTTP response: %v\n", r)
}
// response from `QueryDivision`: QueryDivisionResponse
fmt.Fprintf(os.Stdout, "Response from `MerchantManagementAPI.QueryDivision`: %v\n", r.Body)
}
Step 6 : Inquire user’s available asset card list
Use the Query Asset Card List API to inquire information of user’s available asset card list.
package main

import (
"context"
"fmt"
"os"
dana "github.com/dana-id/dana-go"
"github.com/dana-id/dana-go/config"
merchant_management "github.com/dana-id/dana-go/merchant_management/v1"
)

func main() {
// ... define authentication
request := merchant_management.QueryShopRequest{
  // Fill in required fields here, refer to Query Asset Card List API Detail
}

_, r, err := apiClient.MerchantManagementAPI.QueryAssetCardList(context.Background()).QueryAssetCardListRequest(request).Execute()
if err != nil {
  fmt.Fprintf(os.Stderr, "Error when calling `MerchantManagementAPI.QueryAssetCardList``: %v\n", err)
  fmt.Fprintf(os.Stderr, "Full HTTP response: %v\n", r)
}
// response from `QueryAssetCardList`: QueryAssetCardListResponse
fmt.Fprintf(os.Stdout, "Response from `MerchantManagementAPI.QueryAssetCardList`: %v\n", r.Body)
}
Additional Enum Configuration
The library provides several enums (enumerations) to represent a fixed set of constant values, ensuring consistency and reducing errors during integration.
import merchant_management "github.com/dana-id/dana-go/merchant_management/v1"

value := string(merchant_management.SHOPPARENTTYPE_MERCHANT_)
The following enums are available in the Library Division:
- GOODS_SOLD_TYPE
- USER_PROFILING
- AssetType
- BusinessEntity
- ContactBizType
- DefaultAsset
- DirectDebit
- DivisionIdType
- DivisionType
- DocType
- EnableOnly
- EnableStatus
- Loyalty
- OwnerIdType
- ParentRoleType
- PgDivisionFlag
- ResourceType
- ResultStatus
- SizeType
- Verified
Step 7 : Test using our automated test suite
Visit our Scenario Testing guide for detailed information on testing requirements.
We are required by local regulators to ensure your integration works correctly across all critical use cases. Use our sandbox environment and Merchant Portal to safely conduct UAT testing on a list of mandatory testing scenarios.
To complete our mandatory testing requirements, follow these steps:
- Access your Integration Checklist page inside the Merchant Portal.
- Complete all mandatory testing scenarios listed in the checklist.
- After all required tests have been passed, sign the UAT Sign-Off Report in the Merchant Portal.
- Complete the Devsite Testing through the Merchant Portal to ensure compliance with Bank Indonesia SNAP standards.
UAT Testing Script
Use our specialized UAT testing suite to save days of debugging.
To speed up your integration, we have provided an automated test suite. It takes under 15 minutes to run your integration against our test scenarios. Check out the Github repo for more instructions
Step 8 : Submit testing documents & apply for production
As part of regulatory compliance, merchants are required to submit UAT testing documents to meet Bank Indonesia's requirements. After completing sandbox testing, follow these steps to move to production:
Generate production keys
Create your production private and public keys, follow this instruction: Authentication - Production Credential.Complete your UAT testing checklist
Confirm that you have completed all testing scenarios from our Merchant Portal.Fill out your Production Submission form
Follow the instructions inside our Merchant Portal to apply for production credentials. We will process your application in 1-2 days.Obtain production credentials
Once approved, you will receive your production credentials such as: Merchant ID, Client ID known as X-PARTNER-ID, and Client Secret.
Testing in the Production Environment
Configure the production environment
Update your application settings to switch from the sandbox environment to the production environment by using the correct production API endpoints and credentials.Test using production credentials
Download the Prod E2E Test Verification template in the Merchant Portal and start production testing as instructed. Upload the test results through the Merchant Portal.Receive live payments
After receiving all approvals, your DANA integration will be activated and ready for receive live payments from your customers.
Ready to submit testing documents?
Access our merchant portal for detailed guide to start receiving live payments
Step 1 : Library Installation
Visit our Libraries & Plugins guide for detailed information on our SDK.
DANA provides server-side API libraries for several programming languages, available through common package managers, for easier installation and version management. Follow the guide below to install our library:
Requirements
- PHP 7.4+, compatible with PHP 8.0.
- Your testing credentials from the merchant portal.
Installation
Install using composer or visit our Github- Using Composer
- Add the following code to
composer.json
- Add the following code to
{
  "repositories": [
    {
      "type": "vcs",
      "url": "https://github.com/dana-id/dana-php.git"
    }
  ],
  "require": {
    "danaid/dana-php": "^2.0"
  }
}
- Run
composer install
- Manual Installation
<?php
require_once('/path/to/DanaPhp/vendor/autoload.php');
Set up the env
PRIVATE_KEY or PRIVATE_KEY_PATH         # Your private key
ORIGIN                                  # Your application's origin URL
X_PARTNER_ID                            # clientId provided during onboarding
ENV or DANA_ENV                         # DANA's environment either 'sandbox' or 'production'
DANA_PUBLIC_KEY or DANA_PUBLIC_KEY_PATH # DANA public key string for parsing webhook
CLIENT_SECRET                           # Assigned client secret during registration
Obtaining merchant credentials: Authentication
Import Package
use Dana\MerchantManagement\v1
Step 2 : Initialize the library
Visit our Authentication guide to learn about the authentication process when not using our Library.
Follow the guide below to initialize the library
<?php
use Dana\Configuration;
use Dana\Env;
use Dana\MerchantManagement\v1\Api\MerchantManagementApi;
use Dana\MerchantManagement\v1\Model\QueryShopRequest;

// Set up configuration with authentication settings
$configuration = new Configuration();

// The Configuration constructor automatically loads values from environment variables
// Choose one of PRIVATE_KEY or PRIVATE_KEY_PATH to set, if you set both, PRIVATE_KEY will be ignored
$configuration->setApiKey('PRIVATE_KEY', getenv('PRIVATE_KEY'));
// $configuration->setApiKey('PRIVATE_KEY_PATH', getenv('PRIVATE_KEY_PATH'));
$configuration->setApiKey('ORIGIN', getenv('ORIGIN'));
$configuration->setApiKey('X_PARTNER_ID', getenv('X_PARTNER_ID'));
$configuration->setApiKey('DANA_ENV', Env::SANDBOX);
// Choose one of ENV or DANA_ENV to set, if you set both, ENV will be ignored
// $configuration->setApiKey('ENV', Env::SANDBOX);
$configuration->setApiKey('CLIENT_SECRET', getenv('CLIENT_SECRET'));


$apiInstance = new MerchantManagementApi(
    null, // this also can be set to custom http client which implements `GuzzleHttp\ClientInterface`
    $configuration
);
Step 3 : Save your a new division information
Use Create Division API to create a new division. Each division has a unique identifier (divisionId).
To create a new division, make a POST request to the Create Division API.
<?php
use Dana\Configuration;
use Dana\Env;
use Dana\MerchantManagement\v1\Api\MerchantManagementApi;
use Dana\MerchantManagement\v1\Model\CreateDivisionRequest;

// ... define authentication
$createDivisionRequest = CreateDivisionRequest();

try {
$result = $apiInstance->createDivision($createDivisionRequest);
print_r($result);
} catch (Exception $e) {
echo 'Exception when calling MerchantManagementApi->createDivision: ', $e->getMessage(), PHP_EOL;
}
Step 4 : Maintain your division information by hitting Update Division API
Use this API to update information about an existing division. You can modify existing division (e.g. name, contact details, address, settings).
To update a division, make a POST request to Update Division API.
<?php
use Dana\Configuration;
use Dana\Env;
use Dana\MerchantManagement\v1\Api\MerchantManagementApi;
use Dana\MerchantManagement\v1\Model\UpdateDivisionRequest;

// ... define authentication

$updateDivisionRequest = UpdateDivisionRequest();

try {
$result = $apiInstance->updateDivision($updateDivisionRequest);
print_r($result);
} catch (Exception $e) {
echo 'Exception when calling MerchantManagementApi->updateDivision: ', $e->getMessage(), PHP_EOL;
}
Step 5 : Inquire your division information
Use Query Division API to retrieve the latest division information, such as getting division details by ID or getting a list of all divisions under a merchant.
<?php
use Dana\Configuration;
use Dana\Env;
use Dana\MerchantManagement\v1\Api\MerchantManagementApi;
use Dana\MerchantManagement\v1\Model\QueryDivisionRequest;

// ... define authentication

$queryDivisionRequest = QueryDivisionRequest();

try {
$result = $apiInstance->queryDivision($queryDivisionRequest);
print_r($result);
} catch (Exception $e) {
echo 'Exception when calling MerchantManagementApi->queryDivision: ', $e->getMessage(), PHP_EOL;
}
Step 6 : Inquire user’s available asset card list
Use the Query Asset Card List API to inquire information of user’s available asset card list.
<?php
use Dana\Configuration;
use Dana\Env;
use Dana\MerchantManagement\v1\Api\MerchantManagementApi;
use Dana\MerchantManagement\v1\Model\QueryAssetCardListRequest;

// ... define authentication

$queryAssetCardListRequest = QueryAssetCardListRequest();

try {
    $result = $apiInstance->queryAssetCardList($queryAssetCardListRequest);
    print_r($result);
} catch (Exception $e) {
    echo 'Exception when calling MerchantManagementApi->queryAssetCardList: ', $e->getMessage(), PHP_EOL;
}
Additional Enum Configuration
The library provides several enums (enumerations) to represent a fixed set of constant values, ensuring consistency and reducing errors during integration.
// Importing an enum class
use Dana\MerchantManagement\v1\Enum\GoodsSoldType;

// Using enum constants
$model->setProperty(GoodsSoldType::DIGITAL);

// Using enum values directly as strings
$model->setProperty('DIGITAL');
The following enums are available in the Library Division:
- GoodsSoldType
- UserProfiling
- AssetType
- BusinessEntity
- ContactBizType
- DefaultAsset
- DirectDebit
- DivisionIdType
- DivisionType
- DocType
- EnableOnly
- EnableStatus
- Loyalty
- OwnerIdType
- ParentRoleType
- PgDivisionFlag
- ResourceType
- ResultStatus
- SizeType
- Verified
Step 7 : Test using our automated test suite
Visit our Scenario Testing guide for detailed information on testing requirements.
We are required by local regulators to ensure your integration works correctly across all critical use cases. Use our sandbox environment and Merchant Portal to safely conduct UAT testing on a list of mandatory testing scenarios.
To complete our mandatory testing requirements, follow these steps:
- Access your Integration Checklist page inside the Merchant Portal.
- Complete all mandatory testing scenarios listed in the checklist.
- After all required tests have been passed, sign the UAT Sign-Off Report in the Merchant Portal.
- Complete the Devsite Testing through the Merchant Portal to ensure compliance with Bank Indonesia SNAP standards.
UAT Testing Script
Use our specialized UAT testing suite to save days of debugging.
To speed up your integration, we have provided an automated test suite. It takes under 15 minutes to run your integration against our test scenarios. Check out the Github repo for more instructions
Step 8 : Submit testing documents & apply for production
As part of regulatory compliance, merchants are required to submit UAT testing documents to meet Bank Indonesia's requirements. After completing sandbox testing, follow these steps to move to production:
Generate production keys
Create your production private and public keys, follow this instruction: Authentication - Production Credential.Complete your UAT testing checklist
Confirm that you have completed all testing scenarios from our Merchant Portal.Fill out your Production Submission form
Follow the instructions inside our Merchant Portal to apply for production credentials. We will process your application in 1-2 days.Obtain production credentials
Once approved, you will receive your production credentials such as: Merchant ID, Client ID known as X-PARTNER-ID, and Client Secret.
Testing in the Production Environment
Configure the production environment
Update your application settings to switch from the sandbox environment to the production environment by using the correct production API endpoints and credentials.Test using production credentials
Download the Prod E2E Test Verification template in the Merchant Portal and start production testing as instructed. Upload the test results through the Merchant Portal.Receive live payments
After receiving all approvals, your DANA integration will be activated and ready for receive live payments from your customers.
Ready to submit testing documents?
Access our merchant portal for detailed guide to start receiving live payments
Step 1 : Library Installation
Visit our Libraries & Plugins guide for detailed information on our SDK.
DANA provides server-side API libraries for several programming languages, available through common package managers, for easier installation and version management. Follow the guide below to install our library:
Requirements
- JDK 1.8 or later.
- Your testing credentials from the merchant portal.
Installation
Install using maven or visit our GithubInstall the API Library using maven
- Add the following dependency to your
pom.xml
<dependency>
    <groupId>id.dana</groupId>
    <artifactId>dana-java</artifactId>
    <version>2.1.9</version>
</dependency>
- run
mvn clean install
Set up the env
PRIVATE_KEY or PRIVATE_KEY_PATH        # Private key string (PRIVATE_KEY) or path to private key file (PRIVATE_KEY_PATH)
ORIGIN                                 # Your application's origin URL
X_PARTNER_ID                           # Client ID provided at onboarding
ENV or DANA_ENV                        # DANA's environment either 'sandbox' or 'production'
Obtaining merchant credentials: Authentication
Step 2 : Initialize the library
Visit our Authentication guide to learn about the authentication process when not using our Library.
Follow the guide below to initialize the library
import id.dana.invoker.Dana;
import id.dana.invoker.model.DanaConfig;
import id.dana.util.ConfigUtil;

public class Example {
    public static void main(String[] args) {
        DanaConfig.Builder danaConfigBuilder = new DanaConfig.Builder();
        danaConfigBuilder
            .partnerId("YOUR_PARTNER_ID")
            .privateKey("YOUR_PRIVATE_KEY")
            .origin("YOUR_ORIGIN");
            .env("SANDBOX"); // or "PRODUCTION"

        DanaConfig.getInstance(danaConfigBuilder);

        Dana danaClient = Dana.getInstance();
    }
}
Step 3 : Save your a new division information
Use Create Division API to create a new division. Each division has a unique identifier (divisionId).
To create a new division, make a POST request to the Create Division API.
import id.dana.invoker.Dana;
import id.dana.merchantmanagement.v1.api.MerchantManagementApi;
import id.dana.merchantmanagement.v1.model.CreateDivisionRequest;
import id.dana.merchantmanagement.v1.model.CreateDivisionResponse;

public class Example {
    public static void main(String[] args) {
        MerchantManagementApi api = Dana.getInstance().getMerchantManagementApi();

        CreateDivisionRequest createDivisionRequest = new CreateDivisionRequest();

        try {
            CreateDivisionResponse response = api.createDivision(createDivisionRequest);
            System.out.println(response);
        } catch (DanaException e) {
            e.printStackTrace();
        }
    }
}
Step 4 : Maintain your division information by hitting Update Division API
Use this API to update information about an existing division. You can modify existing division (e.g. name, contact details, address, settings).
To update a division, make a POST request to Update Division API.
import id.dana.invoker.Dana;
import id.dana.merchantmanagement.v1.api.MerchantManagementApi;
import id.dana.merchantmanagement.v1.model.UpdateDivisionRequest;
import id.dana.merchantmanagement.v1.model.UpdateDivisionResponse;

public class Example {
    public static void main(String[] args) {
        MerchantManagementApi api = Dana.getInstance().getMerchantManagementApi();

        UpdateDivisionRequest updateDivisionRequest = new UpdateDivisionRequest();

        try {
            UpdateDivisionResponse response = api.updateDivision(updateDivisionRequest);
            System.out.println(response);
        } catch (DanaException e) {
            e.printStackTrace();
        }
    }
}
Step 5 : Inquire your division information
Use Query Division API to retrieve the latest division information, such as getting division details by ID or getting a list of all divisions under a merchant.
import id.dana.invoker.Dana;
import id.dana.merchantmanagement.v1.api.MerchantManagementApi;
import id.dana.merchantmanagement.v1.model.QueryDivisionRequest;
import id.dana.merchantmanagement.v1.model.QueryDivisionResponse;

public class Example {
    public static void main(String[] args) {
        MerchantManagementApi api = Dana.getInstance().getMerchantManagementApi();

        QueryDivisionRequest queryDivisionRequest = new QueryDivisionRequest();

        try {
            QueryDivisionResponse response = api.queryDivision(queryDivisionRequest);
            System.out.println(response);
        } catch (DanaException e) {
            e.printStackTrace();
        }
    }
}
Step 6 : Inquire user’s available asset card list
Use the Query Asset Card List API to inquire information of user’s available asset card list.
import id.dana.invoker.Dana;
import id.dana.merchantmanagement.v1.api.MerchantManagementApi;
import id.dana.merchantmanagement.v1.model.QueryAssetCardListRequest;
import id.dana.merchantmanagement.v1.model.QueryAssetCardListResponse;

public class Example {
    public static void main(String[] args) {
        MerchantManagementApi api = Dana.getInstance().getMerchantManagementApi();

        QueryAssetCardListRequest queryAssetCardListRequest = new QueryAssetCardListRequest();

        try {
            QueryAssetCardListResponse response = api.queryAssetCardList(queryAssetCardListRequest);
            System.out.println(response);
        } catch (DanaException e) {
            e.printStackTrace();
        }
    }
}
Step 7 : Test using our automated test suite
Visit our Scenario Testing guide for detailed information on testing requirements.
We are required by local regulators to ensure your integration works correctly across all critical use cases. Use our sandbox environment and Merchant Portal to safely conduct UAT testing on a list of mandatory testing scenarios.
To complete our mandatory testing requirements, follow these steps:
- Access your Integration Checklist page inside the Merchant Portal.
- Complete all mandatory testing scenarios listed in the checklist.
- After all required tests have been passed, sign the UAT Sign-Off Report in the Merchant Portal.
- Complete the Devsite Testing through the Merchant Portal to ensure compliance with Bank Indonesia SNAP standards.
UAT Testing Script
Use our specialized UAT testing suite to save days of debugging.
To speed up your integration, we have provided an automated test suite. It takes under 15 minutes to run your integration against our test scenarios. Check out the Github repo for more instructions
Step 8 : Submit testing documents & apply for production
As part of regulatory compliance, merchants are required to submit UAT testing documents to meet Bank Indonesia's requirements. After completing sandbox testing, follow these steps to move to production:
Generate production keys
Create your production private and public keys, follow this instruction: Authentication - Production Credential.Complete your UAT testing checklist
Confirm that you have completed all testing scenarios from our Merchant Portal.Fill out your Production Submission form
Follow the instructions inside our Merchant Portal to apply for production credentials. We will process your application in 1-2 days.Obtain production credentials
Once approved, you will receive your production credentials such as: Merchant ID, Client ID known as X-PARTNER-ID, and Client Secret.
Testing in the Production Environment
Configure the production environment
Update your application settings to switch from the sandbox environment to the production environment by using the correct production API endpoints and credentials.Test using production credentials
Download the Prod E2E Test Verification template in the Merchant Portal and start production testing as instructed. Upload the test results through the Merchant Portal.Receive live payments
After receiving all approvals, your DANA integration will be activated and ready for receive live payments from your customers.
Ready to submit testing documents?
Access our merchant portal for detailed guide to start receiving live payments