Disbursement to Bank
Disbursement to Bank enables direct fund transfers from DANA to users' bank accounts. This API lets you validate bank details, transfer funds, receive status updates, and check transfer statuses. It offers a secure, automated disbursement process that reduces manual work and improves efficiency.
Disbursement is also available for top up to DANA Balance. Check our Disbursement Overview for more details
Before you start
You will need to register your business in our Merchant Portal to obtain your testing credentials. After you have created your test account, make sure you have done the following:
- Finish your company registration and select Disbursement to Bank as your payment solution.
- Merchant Disbursement Account (MDA) will be automatically created for you to store your balance. For sandbox testing, contact the DANA team to top up your account. In production, simply top up via the Virtual Account (VA) displayed in Merchant Portal.
- Setup your webhooks & redirect URLs to receive payment outcomes & redirect user after payment.
- Obtain your testing credentials from the merchant portal.
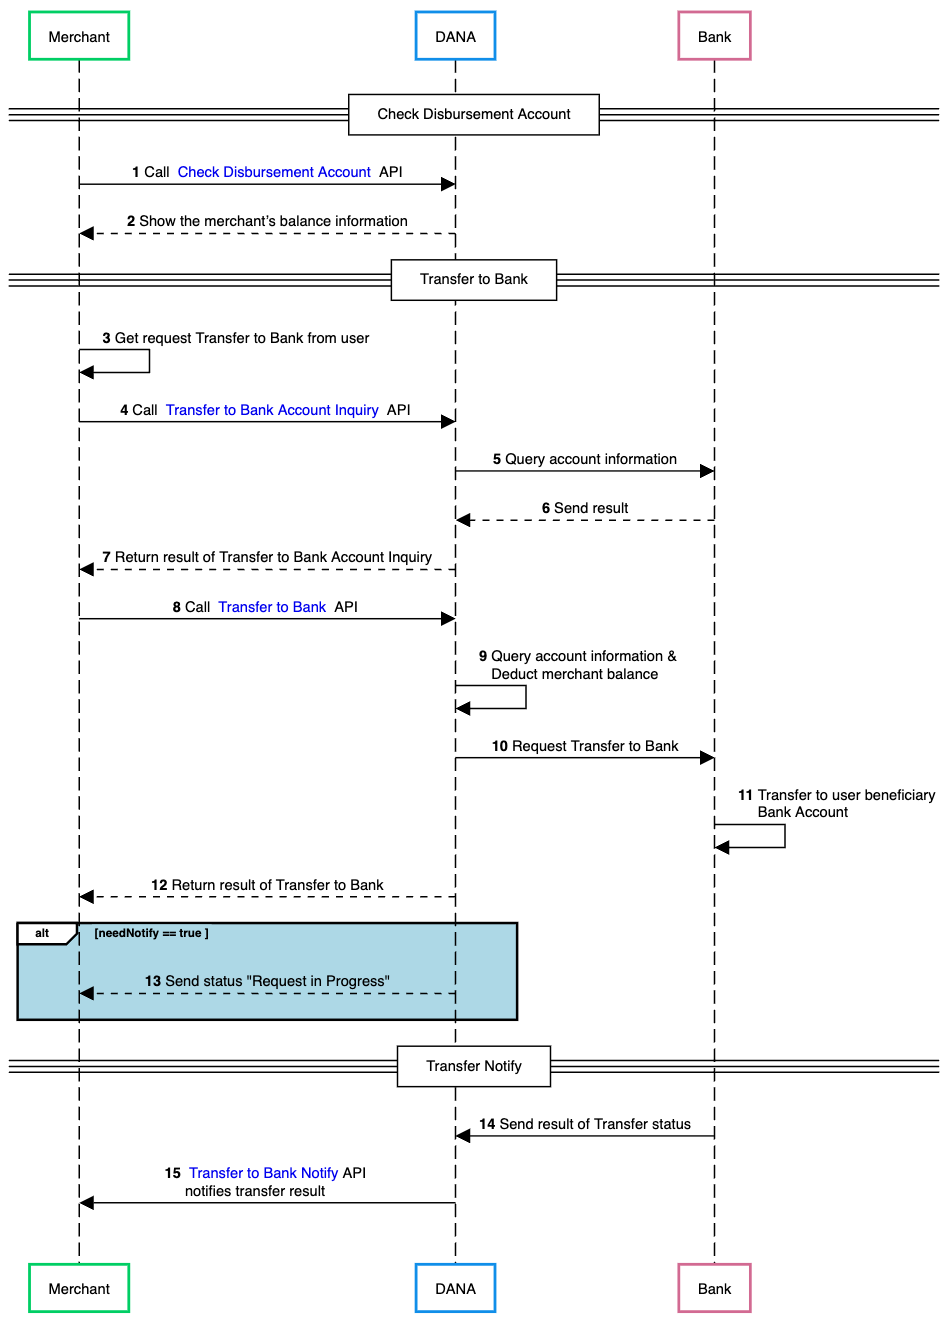
The general flow of payment using the Disbursement to Bank is as follows:
Visit the Disbursement API Overview for edge cases and other scenarios.
- NodeJS
- Python
- Go
- PHP
- Java
Before processing any bank transfer, call DANA's Check Disbursement Account API to verify that your merchant deposit account has sufficient funds. DANA will return your current available balance so you can confirm you have enough money for the transfer amount. If your balance is insufficient, top up your account balance via the Virtual Account (VA) displayed in Merchant Portal.
import { Dana } from 'dana-node';
import { QueryMerchantResourceRequest, QueryMerchantResourceResponse } from 'dana-node/merchant_management/v1';

const danaClient = new Dana({
    partnerId: "YOUR_PARTNER_ID", // process.env.X_PARTNER_ID
    privateKey: "YOUR_PRIVATE_KEY", // process.env.X_PRIVATE_KEY
    origin: "YOUR_ORIGIN", // process.env.ORIGIN
    env: "sandbox", // process.env.DANA_ENV or process.env.ENV or "sandbox" or "production"
});
const { merchantManagementApi } = danaClient;

const request: QueryMerchantResourceRequest = {
    // Define the request parameters for the API call here
};

const response: QueryMerchantResourceResponse = await merchantManagementApi.queryMerchantResource(request);
After verify that your merchant deposit account has sufficient funds, you can add additional testing funds at our Merchant Portal by accessing the "Disbursement Account" tab.

Ready to submit testing documents?
Access our merchant portal for detailed guide to start receiving live payments
Before processing any bank transfer, call DANA's Check Disbursement Account API to verify that your merchant deposit account has sufficient funds. DANA will return your current available balance so you can confirm you have enough money for the transfer amount. If your balance is insufficient, top up your account balance via the Virtual Account (VA) displayed in Merchant Portal.
import os
from dana.utils.snap_configuration import SnapConfiguration, AuthSettings, Env
from dana.merchant_management.v1 import MerchantManagementApi
from dana.merchant_management.v1.models.QueryMerchantResourceRequest import QueryMerchantResourceRequest
from dana.api_client import ApiClient
from dana.rest import ApiException
from pprint import pprint

# configuration and ApiClient object can be used for multiple operations
# They should be singleton through the application lifecycle
configuration = SnapConfiguration(
    api_key=AuthSettings(
        PRIVATE_KEY=os.environ.get("PRIVATE_KEY"), # or you can set PRIVATE_KEY_PATH
        ORIGIN=os.environ.get("ORIGIN"),
        X_PARTNER_ID=os.environ.get("X_PARTNER_ID"),
        DANA_ENV=os.environ.get("DANA_ENV"), # or you can set ENV
        CLIENT_SECRET=os.environ.get("CLIENT_SECRET"),
    )
)


# Configure API key authorization: CLIENT_SECRET
# For OPEN_API type, we use CLIENT_SECRET authentication
configuration = OpenApiConfiguration(
    api_key=OpenApiAuthSettings(
        CLIENT_SECRET=os.environ.get("CLIENT_SECRET"),
        CLIENT_ID=os.environ.get("CLIENT_ID"),
        DANA_ENV=os.environ.get("DANA_ENV"),
        ENV=os.environ.get("ENV")
    )
)

with ApiClient(configuration) as api_client:
    api_instance = MerchantManagementApi(api_client)
    query_merchant_resource_request = QueryMerchantResourceRequest()

    try:
        api_response = api_instance.query_merchant_resource(query_merchant_resource_request)
        print("The response of MerchantManagementApi->query_merchant_resource:\n")
        pprint(api_response)
    except Exception as e:
        print("Exception when calling MerchantManagementApi->query_merchant_resource: %s\n" % e)
After verify that your merchant deposit account has sufficient funds, you can add additional testing funds at our Merchant Portal by accessing the "Disbursement Account" tab.
Ready to submit testing documents?
Access our merchant portal for detailed guide to start receiving live payments
Before processing any bank transfer, call DANA's Check Disbursement Account API to verify that your merchant deposit account has sufficient funds. DANA will return your current available balance so you can confirm you have enough money for the transfer amount. If your balance is insufficient, top up your account balance via the Virtual Account (VA) displayed in Merchant Portal.
package main

import (
  "context"
  "fmt"
  "os"
  dana "github.com/dana-id/dana-go"
  "github.com/dana-id/dana-go/config"
  merchant_management "github.com/dana-id/dana-go/merchant_management/v1"
)

func main() {
  // Define request struct directly (example)
  request := merchant_management.QueryMerchantResourceRequest{
    // Fill in required fields here, refer to Check Disbursement Account API Detail
  }

  configuration := config.NewConfiguration()
  // Set API keys
  configuration.APIKey = &config.APIKey{
    // ENV:          config.ENV_SANDBOX, // use config.ENV_PRODUCTION for production. Can use DANA_ENV instead
    DANA_ENV:     config.ENV_SANDBOX, // use config.ENV_PRODUCTION for production
    X_PARTNER_ID: os.Getenv("X_PARTNER_ID"),
    PRIVATE_KEY:  os.Getenv("PRIVATE_KEY"),
    ORIGIN:       os.Getenv("ORIGIN"),
    // PRIVATE_KEY_PATH: os.Getenv("PRIVATE_KEY_PATH"),
  }
  apiClient := dana.NewAPIClient(configuration)
  _, r, err := apiClient.MerchantManagementAPI.QueryMerchantResource(context.Background()).QueryMerchantResourceRequest(request).Execute()
  if err != nil {
    fmt.Fprintf(os.Stderr, "Error when calling `MerchantManagementAPI.QueryMerchantResource``: %v\n", err)
    fmt.Fprintf(os.Stderr, "Full HTTP response: %v\n", r)
  }
  // response from `QueryMerchantResource`: QueryMerchantResourceResponse
  fmt.Fprintf(os.Stdout, "Response from `MerchantManagementAPI.QueryMerchantResource`: %v\n", r.Body)
}
After verify that your merchant deposit account has sufficient funds, you can add additional testing funds at our Merchant Portal by accessing the "Disbursement Account" tab.
Ready to submit testing documents?
Access our merchant portal for detailed guide to start receiving live payments
Before processing any bank transfer, call DANA's Check Disbursement Account API to verify that your merchant deposit account has sufficient funds. DANA will return your current available balance so you can confirm you have enough money for the transfer amount. If your balance is insufficient, top up your account balance via the Virtual Account (VA) displayed in Merchant Portal.
<?php
  use Dana\Configuration;
  use Dana\Env;
  use Dana\MerchantManagement\v1\Api\MerchantManagementApi;
  use Dana\MerchantManagement\v1\Model\QueryMerchantResourceRequest;

  // Set up configuration with authentication settings
  $configuration = new Configuration();

  // The Configuration constructor automatically loads values from environment variables
  // Choose one of PRIVATE_KEY or PRIVATE_KEY_PATH to set, if you set both, PRIVATE_KEY will be ignored
  $configuration->setApiKey('PRIVATE_KEY', getenv('PRIVATE_KEY'));
  // $configuration->setApiKey('PRIVATE_KEY_PATH', getenv('PRIVATE_KEY_PATH'));
  $configuration->setApiKey('ORIGIN', getenv('ORIGIN'));
  $configuration->setApiKey('X_PARTNER_ID', getenv('X_PARTNER_ID'));
  $configuration->setApiKey('DANA_ENV', Env::SANDBOX);
  // Choose one of ENV or DANA_ENV to set, if you set both, ENV will be ignored
  // $configuration->setApiKey('ENV', Env::SANDBOX);
  $configuration->setApiKey('CLIENT_SECRET', getenv('CLIENT_SECRET'));


  $apiInstance = new MerchantManagementApi(
      null, // this also can be set to custom http client which implements `GuzzleHttp\ClientInterface`
      $configuration
  );
  $queryMerchantResourceRequest = QueryMerchantResourceRequest();

  try {
      $result = $apiInstance->queryMerchantResource($queryMerchantResourceRequest);
      print_r($result);
  } catch (Exception $e) {
      echo 'Exception when calling MerchantManagementApi->queryMerchantResource: ', $e->getMessage(), PHP_EOL;
  }
After verify that your merchant deposit account has sufficient funds, you can add additional testing funds at our Merchant Portal by accessing the "Disbursement Account" tab.
Ready to submit testing documents?
Access our merchant portal for detailed guide to start receiving live payments
Before processing any bank transfer, call DANA's Check Disbursement Account API to verify that your merchant deposit account has sufficient funds. DANA will return your current available balance so you can confirm you have enough money for the transfer amount. If your balance is insufficient, top up your account balance via the Virtual Account (VA) displayed in Merchant Portal.
import id.dana.invoker.Dana;
import id.dana.merchantmanagement.v1.api.MerchantManagementApi;
import id.dana.merchantmanagement.v1.model.QueryMerchantResourceRequest;
import id.dana.merchantmanagement.v1.model.QueryMerchantResourceResponse;

public class Example {
    public static void main(String[] args) {
        MerchantManagementApi api = Dana.getInstance().getMerchantManagementApi();

        QueryMerchantResourceRequest queryMerchantResourceRequest = new QueryMerchantResourceRequest();

        try {
            QueryMerchantResourceResponse response = api.queryMerchantResource(queryMerchantResourceRequest);
            System.out.println(response);
        } catch (DanaException e) {
            e.printStackTrace();
        }
    }
}
After verify that your merchant deposit account has sufficient funds, you can add additional testing funds at our Merchant Portal by accessing the "Disbursement Account" tab.
Ready to submit testing documents?
Access our merchant portal for detailed guide to start receiving live payments